Vaulted ceilings are a blessing, and a lighting puzzle. That open, soaring space that makes a room feel grand can make pendant lighting tricky if you don’t know the design rules. Too high and your light disappears into the void. Too low and you’ve created a dangling obstacle. Get it right, though, and vaulted ceiling pendant lighting becomes the anchor that ties a room together. This guide walks you through the why, the how, and the specific design moves that work in 2026, whether you’re upgrading a kitchen, dining room, or foyer.
Table of Contents
ToggleKey Takeaways
- Vaulted ceiling pendant lighting should hang 30 to 36 inches below the lowest ceiling point or above fixtures to keep light in the living zone rather than disappearing into the architectural void.
- Use the thirds rule for spacing: divide the surface length into thirds and hang pendants in the center of each section to maintain visual proportion and even light distribution.
- Choose fixture styles and sizes that match your room’s existing finishes and architecture—aim for a diameter roughly one-third the width of the surface being lit to avoid clashing or overwhelming the space.
- Plan your electrical routing before installation by identifying joists, running cable parallel to framing whenever possible, and checking local code requirements to avoid costly mistakes.
- Layer pendant lighting with recessed lights, undercabinet systems, or dimmers to create zones and adjust ambiance without wasting light toward the peak of the vaulted ceiling.
- Call a professional electrician if your vaulted ceiling has structural issues, outdated wiring, or insulation that makes cable routing difficult, as safety and code compliance are non-negotiable.
Why Pendant Lighting Works Best for Vaulted Ceilings
Pendant lighting hangs, which means it can descend into the living space rather than disappearing into the peak. A flush mount bolted directly to the ceiling at 10 feet? That’s wasted light and wasted design. A pendant on a chain or rod drops down into the room, creating visual interest, layering ambient and task lighting, and keeping your eyes at a comfortable focal point.
Vaulted ceilings actually demand pendant lighting for functional reasons too. They’ve got volume to fill without spreading light all the way to the peak. Pendants create pools of light, at a kitchen island, above a dining table, or in an entryway, where you need it. Recessed lights work too, but they’ll require more fixtures to avoid dark zones, and they won’t add the architectural punch a well-chosen pendant delivers.
The angle of a vaulted ceiling (typically 45 to 60 degrees, depending on pitch) means that conventional overhead fixtures cast shadows along the sloped surfaces. Pendants, by contrast, can be positioned to wash those angles with light or accent them, depending on your design intent. This gives you flexibility, something most traditional fixtures don’t offer.
Key Design Considerations Before You Install
Before you pick a fixture and start drilling, nail down the fundamentals. Vaulted ceiling pendant lighting isn’t one-size-fits-all, and a misstep in planning becomes a permanent eyesore until you rewire.
Determining the Right Height and Spacing
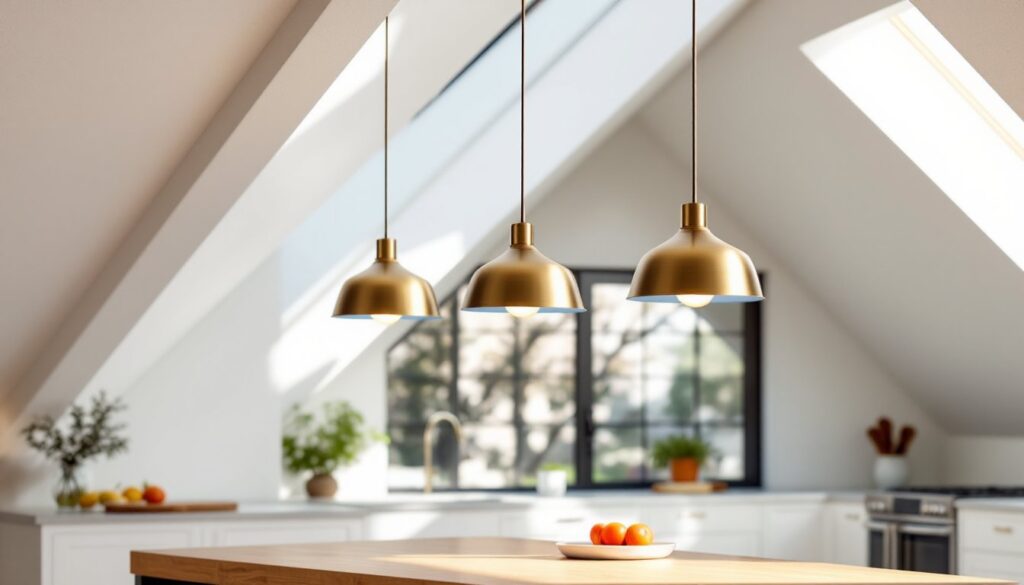
Height matters more than most people think. The rule of thumb: hang a pendant 30 to 36 inches below the lowest point of the ceiling, or use sightlines to guide you. Stand where you’ll be sitting or working. A dining pendant should clear the table by 30 to 36 inches. A kitchen island pendant should let you see across the island without staring into the light.
Spacing depends on the room. For multiple pendants over a kitchen island, use the “thirds rule”, divide the island length into thirds and hang a pendant in the center of each section. If you’ve got a 6-foot island, three pendants spaced roughly 2 feet apart (center to center) keeps them proportional. For a 4-foot island, two pendants work: for 8 feet or longer, consider four.
Don’t let the vaulted pitch fool you into hanging pendants too high. Aim for a visual balance: your pendant should sit in the upper third of the wall, not vanish into the architectural void. Transform Your Space with explores how fixture placement shapes spatial perception, a principle that applies directly to vaulted geometry.
Choosing Fixture Styles That Complement Your Space
Style and function are inseparable. A farmhouse pendant in brushed metal looks at home in a cottage kitchen but will clash with a mid-century modern dining area. A minimalist drum pendant floats in a contemporary loft but feels out of place in a traditional home with crown molding.
Consider the room’s existing finishes. If you’ve got brass hardware elsewhere, a brass pendant unifies the look. If your cabinetry is painted white and your counters are light, a colorful or textured pendant adds personality without overwhelming. Glass pendants (clear, frosted, or tinted) suit kitchens and bathrooms where you need to see the bulb and control glare. Opaque metal or ceramic shades work in dining rooms where ambient light is secondary to atmosphere.
Size scales to the space. A massive industrial pendant works over an island in a 12-foot-ceiling kitchen: the same fixture would dwarf a 9-foot vaulted foyer. Aim for a fixture diameter roughly one-third the width of the surface you’re lighting. A 4-foot-wide island gets a 12- to 16-inch-diameter pendant (or three 10-inch ones). Transform Your Space: The covers finish and aesthetic layering in depth for homeowners planning multiple light sources in one room.
Step-by-Step Installation Guide for DIY Homeowners
Before you start: Turn off power at the breaker. A voltage tester confirms the circuit is dead, don’t skip this step. Most pendant installations require you to reroute existing wiring or run new 14/2 or 12/2 Romex cable through the ceiling cavity. If your vaulted ceiling is open (drywall finished but no insulation above), you’re in luck. If it’s insulated, running wire gets harder and may require professional help.
Materials needed:
- Pendant fixture kit (includes canopy, chain, and mounting hardware)
- 12/2 or 14/2 Romex cable (check local code: 12-gauge for 20-amp circuits)
- Wire connectors (wire nuts, Wago connectors, or similar)
- New electrical box (if not reusing existing junction box)
- Drywall patch compound and mesh tape (if cutting into drywall)
- Drywall screws and anchors
Tools:
- Voltage tester (non-negotiable)
- Screwdrivers (Phillips and flathead)
- Wire strippers
- Drywall saw or oscillating multi-tool
- Stud finder
- Drill with bits
- Level
Safety gear: Safety glasses, work gloves, and a dust mask if you’re cutting into existing drywall or insulation.
Installation steps:
-
Cut the hole for the electrical box. Mark the location using your fixture’s template or a stud finder to locate the nearest joist. In a vaulted ceiling, avoid cutting across joists, run the wire parallel to them whenever possible. Cut a hole sized for your electrical box (typically 2.125 inches for a standard new-work or old-work box).
-
Install the electrical box. If the joist allows, screw an electrical box directly to it. If not, use an old-work box with expanding wings that clamp to drywall. Make sure the box is flush with the finished ceiling surface.
-
Run the cable. Strip about 6 inches of sheathing from the Romex cable. Feed the cable through the box and up to the source circuit (the breaker or existing junction box). Secure it to framing with staples every 16 inches, rough-in rules still apply inside walls.
-
Make connections. Once the cable is in place and power is off, connect the black (hot), white (neutral), and bare copper (ground) wires using wire connectors. Black to black, white to white, ground to ground. Wrap connections with electrical tape if using older wire nuts.
-
Mount the canopy. The pendant’s canopy screws to the electrical box. Follow the fixture instructions, some use a mounting bracket, others a crossbar. Make sure it’s level before tightening.
-
Hang the chain and attach the pendant. Most pendants thread chain link through the canopy support, then the fixture body hangs from the chain. Adjust the chain length so the pendant hangs at your planned height. Secure the bulb and test the fixture before you button up the drywall.
-
Restore the ceiling. If you cut into drywall, patch the hole with joint compound and mesh tape. Sand smooth and paint to match.
When to call a pro: If your vaulted ceiling has structural issues, knob-and-tube wiring, or insulation that makes running cable nearly impossible, hire a licensed electrician. Running new circuits in vaults also depends on local code, some jurisdictions require permits for any new hardwired fixtures. Check with your local building department.
Lighting Tips for Different Room Types and Layouts
Kitchens with vaulted ceilings often have islands or peninsulas, making pendants the obvious task-lighting choice. Hang them low enough (30 to 36 inches above the counter) to provide direct light on work surfaces, but high enough that tall people won’t bump their heads. Pair pendants with recessed lights or a dimmer-enabled undercabinet system to layer ambient and task light. A pendant above the island, another above a bar seating area, this approach uses light to define zones without wasting it into the peak.
Dining rooms benefit from a single statement pendant or a pair over the table. Keep the bottom of the fixture 30 to 36 inches above the tabletop so diners can see each other without light glare. Matte metal or textured glass diffuses light more evenly than clear fixtures, and dimmers let you adjust ambiance for different occasions.
Foyers and entryways need pendants that make an immediate impression. A vaulted foyer is often the first thing guests see, so a well-proportioned pendant in materials that match your overall aesthetic creates entry-level design impact. Hang it centered and low enough to feel intentional, around 6 feet from the floor, rather than lost in the ceiling height.
Modern design trends increasingly favor pendant clusters and mixed-height arrangements for visual rhythm in open floor plans. If your vaulted space flows from kitchen to living room, consider a pendant lineup that guides the eye through the space rather than stopping at one focal point. Recessed Lighting: Enhance Your pairs well with pendants in zones where you want supplemental ambient light without visible fixtures. Interior design resources like MyDomaine showcase real installations where layered lighting, pendants, recessed, and under-cabinet, creates professional results in vaulted spaces.
Conclusion
Vaulted ceiling pendant lighting isn’t complicated once you understand the core principles: hang fixtures low enough to stay in the living zone, choose styles that suit your space, space multiple pendants evenly, and plan your electrical route before you climb the ladder. Get the height and spacing right, and pendants transform a vaulted ceiling from an underlit architectural feature into the design anchor your room needs. Whether you’re wiring it yourself or hiring an electrician, the upfront planning pays off every time you flip the switch.

