A well-lit yard isn’t just about seeing after dark, it’s about turning your outdoor space into an extension of your home that feels safe, welcoming, and beautiful. LED landscape lighting has revolutionized how homeowners approach outdoor yard lighting, making it more affordable and energy-efficient than ever before. Whether you’re adding light to a pathway, highlighting a garden feature, or creating ambiance for entertaining, LED fixtures deliver crisp illumination with minimal electricity draw. This guide walks you through everything you need to know to plan, choose, and install LED landscape lighting that transforms your outdoor space into something you’ll actually want to use when the sun goes down.
Table of Contents
ToggleKey Takeaways
- LED landscape lighting reduces energy consumption by 50-75% compared to traditional halogen systems and lasts 25,000 to 50,000 hours, recouping higher upfront costs within two to three seasons.
- A thoughtful LED landscape lighting design prioritizes safety (pathways and entries), visibility (zones you use), and beauty through layered ambient, task, and accent lighting.
- Plan your system by walking your property at dusk, marking priority zones and features, measuring distances for voltage drop calculations, and using odd-numbered fixture arrangements for natural spacing.
- Most homeowners can install low-voltage LED landscape lighting systems without permits by laying buried wire, connecting waterproof fixtures, and testing the system before final installation.
- Different LED fixture types—path lights, spotlights, wash lights, and accent lights—serve specific purposes, with power consumption ranging from 0.5 watts (string lights) to 8 watts (spotlights).
Why LED Is the Smart Choice for Landscape Lighting
LED landscape lighting has become the default choice for good reason. Unlike incandescent or halogen fixtures that waste energy as heat, LEDs convert nearly all their power into actual light. They last significantly longer, most quality LED landscape lights run for 25,000 to 50,000 hours compared to 1,000 hours for traditional bulbs, which means fewer replacements and less maintenance headaches over time.
The real benefit is that LED landscape lighting integrates seamlessly with modern outdoor yard lighting designs while cutting your energy costs substantially. An LED path light draws about 3-5 watts versus 20+ watts for a comparable incandescent model. Over a season, that difference adds up quickly, especially if you’re running lights four to six hours nightly.
Energy Efficiency and Long-Term Cost Savings
Here’s the math: A typical low-voltage LED landscape light system uses 20-30 watts total for an entire yard setup, whereas older halogen systems could demand 300-500 watts for similar coverage. That translates to roughly 50-75% less energy consumption and noticeably lower electricity bills.
LED fixtures also tolerate voltage fluctuations better than traditional bulbs, making them more reliable on low-voltage transformer systems common in residential landscapes. They’re dimmable on compatible systems, so you can adjust mood and brightness without the flicker or color shift you’d see with incandescent dimming. The upfront cost is higher, expect to pay $20-$60 per fixture versus $10-$20 for older tech, but you’ll recoup that investment within two to three seasons through energy savings alone. Outdoor ceiling lighting shares many of these efficiency advantages when extending illumination to covered outdoor areas.
Types of LED Landscape Lights for Every Outdoor Space
LED landscape lights come in several functional types, each designed to solve a specific outdoor lighting challenge. Understanding which fixture does what helps you build a well-rounded system rather than installing random lights and hoping they look good.
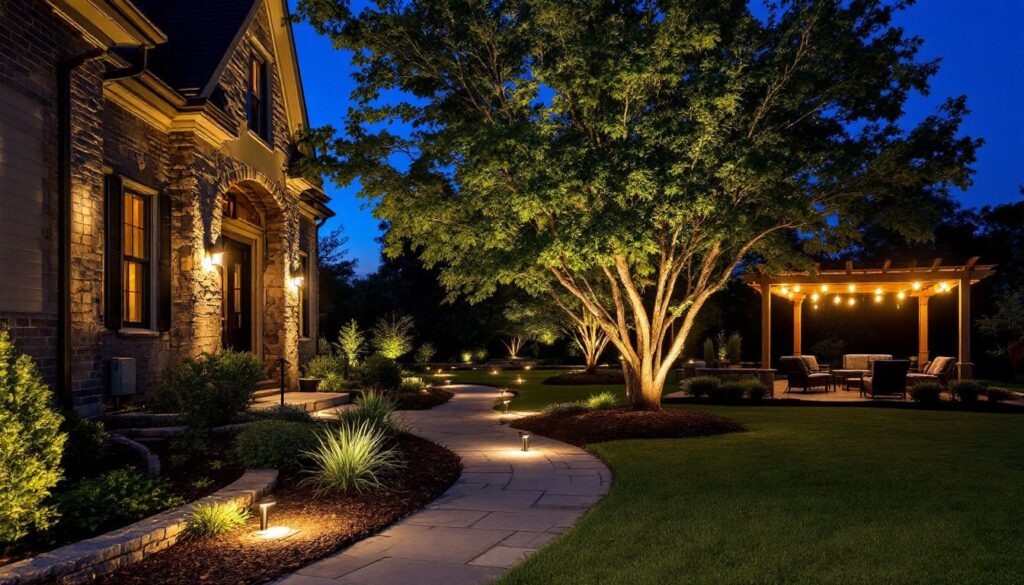
Path lights are the workhorses of landscape lighting, low (typically 6-12 inches), stake-mounted fixtures that line walkways, driveways, and garden beds. They provide just enough light to navigate safely without creating harsh glare or light pollution. Spotlights mount higher and direct a focused beam at features you want to emphasize: a specimen tree, stone wall, or architectural detail. They’re available as uplights (shining upward), downlights (pointing down from trees or eaves), or adjustable fixtures. Wash lights spread illumination across a broader area, useful for grazing light across a fence or creating ambient glow across a patio.
Accent lights highlight smaller details like sculptures, planters, or architectural trim. Deck and step lights sit flush with surfaces to mark transitions and prevent trips. String lights and rope lights work great for pergolas, fences, or entertaining spaces, they’re more decorative than functional but add wonderful atmosphere.
Spotlights, Path Lights, and Accent Lighting Options
Path lights typically draw 1-3 watts and come in colors ranging from warm white (2700K-3000K, resembling traditional incandescent warmth) to cool white (5000K-6500K, resembling daylight). For residential landscape lighting, warm white is the friendlier choice, it feels inviting rather than institutional. Most path lights use 12-volt low-voltage transformers, which are safer and easier to install than 120-volt wiring (no permits required in most jurisdictions for the light fixtures themselves, though transformer installation may need inspection depending on local code).
Spotlights are available in adjustable heads (you aim them after installation) or fixed beam angles (30°, 60°, etc.). A 30° beam creates dramatic, narrow pools of light, perfect for trees or tall features. A 60° beam spreads wider and works better for walls or ground-level features. Quality spotlights include glare shields or louvers to control light direction and reduce light pollution spilling into neighbors’ yards.
Accent lights and uplights are the storytellers of landscape design. A single uplight beneath a deciduous tree casts intricate shadow patterns across your home’s facade. Two uplights flanking your front entry frame it beautifully. The key is restraint, accent lighting should highlight specific features, not blast the entire yard.
Power consumption varies: spotlights (5-8 watts), string lights (0.5-2 watts per bulb), and deck lights (1-2 watts). Outdoor wall lighting shares mounting and aiming principles with spotlights when attached to home exteriors.
Planning Your LED Landscape Lighting Design
A scattered collection of lights is just that, scattered. A thoughtful design plan ensures your landscape lighting serves both function and aesthetics. Start by identifying three priorities: safety (pathways, steps, entries), visibility (seeing who’s approaching), and beauty (highlighting features that matter to you).
Safety comes first. Any transition, from deck to lawn, along a driveway, down steps, needs subtle lighting so nobody takes a tumble after dark. Path lights every 4-6 feet work well: they don’t need to be bright, just present. Entries and garage areas need more consistent light so you can unlock a door or see an unexpected visitor.
Visibility means lighting the zones you actually use and care about seeing. If you entertain on your patio, ensure the patio itself and the path leading to it are well-lit. If you park in the driveway, add a light or two there. Consider sight lines from your home: what do you see through windows at night? Backlighting or uplighting those elements creates depth and curb appeal.
Beauty is personal, but good landscape lighting generally follows the principle of layering. Layer ambient light (overall soft illumination), task light (specific bright areas for function), and accent light (dramatic highlights on features). This three-tier approach feels intentional and inviting rather than flat or chaotic.
Assessing Your Outdoor Space and Setting Goals
Walk your property at dusk and early evening with a notebook. Mark where you naturally walk, where you sit, and what you see from key vantage points (kitchen window, front porch, driveway). These are your priority zones for lighting. Note existing features: mature trees, stone walls, architectural details, plantings. These become your accent lighting candidates.
Measure distances: from your transformer to the farthest fixture (important for voltage drop calculations), between path lights, and the height and spread of trees you want to uplift. If the longest run is more than 100 feet from the transformer, you may need to boost transformer wattage or use larger-gauge wire (12-gauge instead of 14-gauge) to prevent voltage drop, which dims distant lights.
Assess your power source. Most residential systems use a standard 12-volt transformer plugged into a GFCI-protected outdoor outlet (ground-fault circuit interrupter, a safety requirement). Low-voltage systems don’t require permits in most areas, but check your local building code. Some jurisdictions have restrictions on outdoor transformer placement or require licensed installation for anything 120 volts or higher.
Set a realistic budget. A modest pathway system (6-8 path lights, 2-3 accent lights) costs $150-$400 including the transformer and wiring. A more comprehensive design covering a larger property might run $500-$1,500. Solar street lighting offers a cost-effective alternative for properties without convenient outlet access, though performance varies with seasonal daylight and local weather.
Installation Tips for DIY Landscape Lighting Projects
Most homeowners can install a low-voltage LED landscape lighting system without special permits or licensing. The process is straightforward if you follow a logical sequence and don’t skip the prep work.
Start by mapping your layout. Stake out fixture locations during daylight using garden markers or painted dots. Step back and visualize the effect, this is your last chance to adjust positions before you’re running wire. For path lights, odd numbers (3, 5, 7) feel more natural than even spacing: stagger them rather than lining them in a rigid row.
Gather your materials: low-voltage transformer (usually 100-300 watts depending on total fixture wattage), 12-gauge outdoor wire, LED fixtures, low-voltage connectors (most modern systems use twist-lock or waterproof junction connectors), a screwdriver, wire strippers, and a voltage meter. Don’t cheap out on wire gauge, undersized wire wastes voltage as heat and dims your distant lights.
Install the transformer first. Mount it near an outdoor outlet, typically on the home’s exterior wall or a garage. Plug it in, verify outlet is GFCI-protected, and run your main wire from the transformer to the first fixture location. Use a single continuous wire loop if possible rather than splicing in the middle of the yard, fewer connections mean fewer failure points.
Lay out wire along the path. Run 12-gauge wire just below the soil surface (bury it 2-3 inches deep to protect it from lawn equipment and weather exposure). Along walkways, you can leave wire on the surface if needed, but buried looks cleaner and protects it from foot traffic and UV degradation. Avoid sharp bends: let the wire follow gentle curves. If you need to splice, use waterproof connectors rated for outdoor use, not cheap wire nuts.
Connect fixtures according to the manufacturer’s diagram. Most modern LED landscape lights use waterproof connectors that click or twist together: you shouldn’t need to strip and solder wires. Test the system before burying all wire, plug in the transformer and verify every light illuminates. If some lights are dim, you may have a voltage drop issue: you’ll either need a larger transformer, thicker wire, or fewer fixtures on that circuit.
Set timers and sensors. Modern LED systems work beautifully with daylight sensors (photocells) that turn lights on at dusk and off at dawn, or timers that activate lights for specific hours. These typically plug into the transformer outlet. Dusk-to-dawn sensors prevent accidentally leaving lights running all night and reduce energy use.
Maintenance is minimal. Clean fixtures occasionally, dust and pollen reduce light output, and check connections yearly for corrosion. LED bulbs don’t fail suddenly like incandescents: they gradually dim over thousands of hours. When that happens (probably 5-10 years in), you’re just replacing the bulb or fixture, not rewiring anything.
For larger systems spanning multiple circuit loops or for 120-volt installations, consider hiring a licensed electrician. The DIY risk-to-effort ratio shifts when dealing with higher voltage or extensive buried wiring. Recent reviews on smart home lighting technology highlight how automated LED systems with app control and scene programming can enhance landscape lighting further, though the basics of physical installation remain the same.

