Low ceilings and cramped square footage aren’t obstacles, they’re constraints that demand smarter lighting choices. A small kitchen with a low ceiling can feel dim, cramped, and inefficient if the wrong fixtures dominate the space. But strategic low ceiling small kitchen lighting transforms these spaces, making them feel larger, brighter, and more functional. The right fixtures sit flush or low-profile, distribute light evenly, and create visual interest without consuming precious headroom. This guide walks you through the fixture types, placement strategies, and installation steps to brighten your compact kitchen and reclaim that hardworking space.
Table of Contents
ToggleKey Takeaways
- Low ceiling small kitchen lighting requires a layered approach combining ambient, task, and accent lighting in flush-mount or low-profile fixtures to avoid creating a cramped, shadow-prone space.
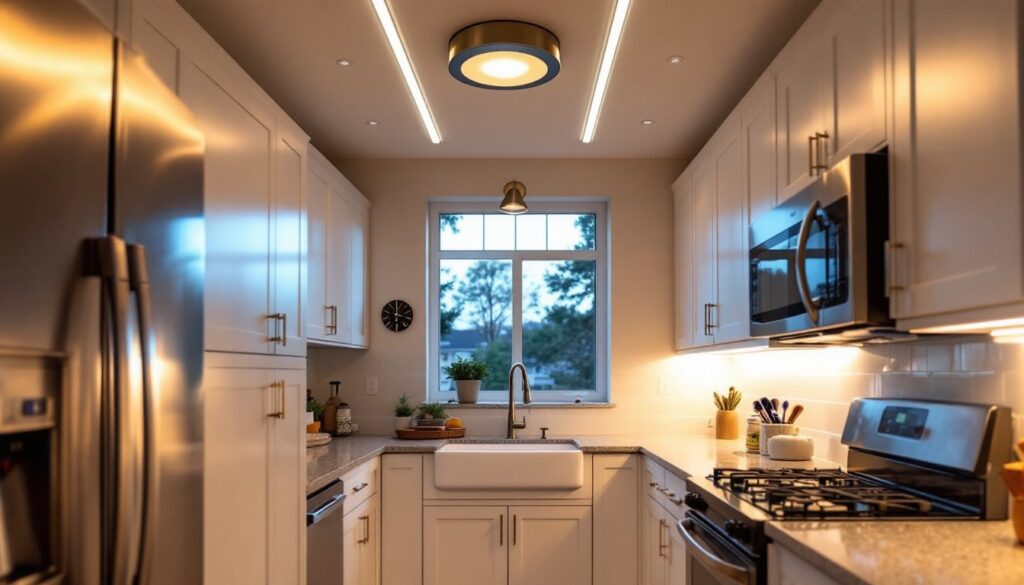
- Flush mounts and semi-flush lights are ideal for ceilings under 8 feet because they attach directly to the ceiling and distribute light in a wide cone without consuming precious headroom.
- Under-cabinet LED lighting is essential in small kitchens as it eliminates shadow lines on prep surfaces and makes the space feel brighter and more spacious when paired with overhead ambient light.
- Position your primary overhead fixture 18–24 inches from walls in the center of the room, and space multiple fixtures evenly to prevent dark corners and maintain visual balance.
- Following proper safety protocols—including turning off power at the breaker and testing circuits with a non-contact voltage tester—is non-negotiable when installing low ceiling small kitchen lighting fixtures yourself.
Why Low Ceilings And Small Kitchens Need Strategic Lighting
Low ceilings, typically 8 feet or less in older homes, change how light bounces around a kitchen. Standard pendant lights hang 18–24 inches below a 9-foot ceiling without issue: in a 7.5-foot space, they become obstacles and visual anchors that make the room feel boxier. Small kitchens already lack horizontal spread, so overhead lighting must work harder to fill corners and prevent dark zones near counters and appliances.
Poor lighting in compact kitchens creates a domino effect. You squint at cutting boards, miss details while cooking, and end up installing task lights reactively instead of planning a cohesive scheme. A layered approach, combining ambient, task, and accent lighting in low-profile fixtures, solves this. Strategic placement ensures light bounces off walls and ceilings rather than being trapped overhead, which visually lifts the entire room.
Building code doesn’t mandate specific lumen output in kitchens (that’s more about energy codes and efficiency standards), but the National Kitchen and Bath Association recommends 50 foot-candles of task lighting above work surfaces. In a low-ceiling space, hitting that target with recessed lights, under-cabinet strips, and carefully positioned fixtures is far more practical than a single statement chandelier.
Best Lighting Fixtures For Low Ceiling Small Kitchens
The fixture type you choose sets the tone. Oversized pendants and chandeliers have no place in a 7-foot kitchen, they block sight lines and cast shadows in the wrong spots. Flush mounts, semi-flush designs, and linear track systems are the workhorses. Recessed lighting works beautifully for ambient fill, and under-cabinet lighting options eliminate shadow lines on your prep surface. Resources like The Kitchn showcase compact kitchen solutions that integrate these fixture types elegantly.
Flush Mount And Semi-Flush Lights
Flush mounts attach directly to the ceiling with no pendant rod or stem, ideal for ceilings under 8 feet. They distribute light in a wide cone and eat up minimal headroom. A semi-flush mount hangs 4–8 inches below the ceiling, offering a sleeker profile than a traditional pendant while providing more visual interest than a flat flush design.
When sizing, aim for a fixture width equal to about one-third of your kitchen’s smallest dimension. A galley kitchen 10 feet long and 6 feet wide? A 12-inch wide flush or semi-flush works well, not so small it looks undersized, not so large it dominates the space. Look for fixtures with frosted or diffused glass or acrylic covers to soften glare: a bare bulb in a 7-foot ceiling throws harsh shadows.
Flush mounts work best paired with recessed lighting or under-cabinet strips. One fixture alone won’t adequately light a small kitchen: layering fixtures ensures even illumination without dead zones.
Linear And Track Lighting Options
Linear ceiling lights (long, narrow fixtures that look like a bar or tube) fit naturally into tight spaces and distribute light linearly rather than in a dome. A 3-foot linear flush mount over a galley counter covers the full length without hanging pendants. They’re flexible for irregular kitchen shapes and cast light in a uniform band.
Track lighting lets you aim fixtures where you actually work. Mount a 2-fixture or 3-fixture track on a low ceiling and angle the heads toward the sink, range, or island, not straight down. Track systems are ideal for kitchens where work zones don’t align with a simple center-point layout. Drawback: track hardware is visible, so choose finishes (brushed nickel, matte black) that complement your décor.
Artistic ceiling fixtures can also serve small kitchens if you choose a low-profile design. Avoid bulky drum shades or cascading elements: opt for clean, contemporary silhouettes that don’t steal vertical space.
DIY Placement And Layout Tips
Location is everything in a low-ceiling kitchen. Place your primary overhead fixture (flush mount or linear) in the center of the room, roughly 18–24 inches from walls if possible. This prevents the fixture from looking awkwardly off-center and ensures light spreads to perimeter counters.
For galley kitchens, run linear fixtures along the length of one or both counters rather than centering a single round fixture, you’ll eliminate shadow lines directly in front of your workspace. Island kitchens benefit from one to two low-profile fixtures mounted along the island’s long axis, positioned 30 inches above the countertop (roughly 8 feet from the floor in a standard 7.5-foot ceiling).
Under-cabinet lighting is non-negotiable in small kitchens. Install low-voltage LED tape or puck lights under wall cabinets to illuminate countertops without shadows. This layering, overhead ambient light plus under-cabinet task light, makes the kitchen feel brighter and more spacious. Kitchen sink lighting deserves its own consideration: if your sink isn’t directly below an overhead fixture, add a dedicated under-cabinet or track-mounted task light to avoid leaning over dark water.
Measure from the nearest wall to the first light fixture and space fixtures evenly. In a 12-foot kitchen, two fixtures spaced at 4 feet from each end, 4 feet apart, creates balance. Avoid clustering lights on one end, the far corner will feel dim and cave-like.
Practical Installation Steps For Homeowners
Installing a flush or semi-flush fixture is manageable for a confident DIYer, but you must turn off power at the breaker and test the circuit with a non-contact voltage tester, not optional. Wear safety glasses and gloves: electrical work has real risks.
Materials needed:
• Flush or semi-flush fixture (complete with mounting bracket, screws, and wire nuts)
• 14/2 or 12/2 electrical wire (gauge depends on circuit amperage: ask at the electrical supply shop)
• Wirenut connectors
• Electrical tape
• Mounting hardware (supplied with fixture)
Basic steps:
- Turn off power at the breaker and confirm the circuit is dead with your non-contact tester.
- Remove the old fixture (if replacing) by untwisting wire connections and unscrewing the mounting bracket.
- Check the ceiling box: it must be rated for the fixture’s weight. A small flush mount (under 5 lbs) works with standard boxes: heavier pieces require a rated electrical box. Never assume.
- Install the mounting bracket according to the fixture’s manual, slight variations exist between brands.
- Thread wire through the fixture’s stem (or body, if flush). Connect hot (black) to hot, neutral (white) to neutral, and ground (bare copper) to ground using wire nuts. Twist each connection tightly and wrap with electrical tape.
- Push the fixture up into the ceiling, secure with screws, and hand-tighten trim rings or cover plates.
- Install bulbs (check the fixture’s max wattage: most modern fixtures use LED A19 bulbs, 60-watt equivalent or less).
- Restore power and test.
For installing under-cabinet lighting, most LED tape is low-voltage (12V), requiring a small transformer. Run the transformer’s cord through a wall cavity or along a cabinet side to a nearby outlet. Use a level and rubberized adhesive backing: avoid forcing wire around tight corners. If the LED tape doesn’t stick securely, use small clips or brackets every 12 inches.
Track lighting involves more wiring: if you’re uncertain, call an electrician. The tracks themselves mount with toggle bolts or lag screws into studs or blocking, no shortcuts. Apartment Therapy covers various fixture solutions for small space living, including lighting strategies that don’t require rewiring.
Conclusion
A low-ceiling small kitchen doesn’t need dim, cramped lighting. Layer flush mounts, under-cabinet strips, and track lights to create depth and function without consuming headroom. Measure twice, choose low-profile fixtures, and don’t skip the under-cabinet task light, it’s the detail that transforms the space. If you’re unsure about electrical wiring, hire a licensed electrician: improper connections aren’t worth the risk. Well-lit kitchens feel larger, cook better, and make your home more enjoyable every single day.

