A covered patio is an outdoor extension of your home, a place where you entertain, relax, and spend time with family. But when the sun drops, poor lighting turns that inviting space into a dark, unusable corner. The right covered patio lighting doesn’t just solve the problem: it transforms the whole experience. Whether you’re hosting a dinner party, reading a book, or simply enjoying the evening air, thoughtful lighting sets the mood and makes the space safe and functional. This guide walks you through fixture options, planning strategies, and practical installation steps to get your patio lit right.
Table of Contents
ToggleKey Takeaways
- Covered patio lighting serves three essential functions—safety, ambiance, and extended usable hours—transforming your outdoor space into an inviting retreat regardless of the time of day.
- Layer different fixture types (recessed, flush mounts, string lights, sconces, and pendants) to achieve balance and flexibility, allowing you to adjust brightness and mood for any occasion.
- Plan your covered patio lighting layout by mapping zones, calculating foot-candles (20–30 for dining, 5–15 for seating), and distributing fixtures across the ceiling rather than relying on a single central light.
- Use damp-rated or wet-rated fixtures appropriate to your roof design, warm white bulbs (2700K) for cozy ambiance, and LED technology for energy efficiency and longer lifespan.
- Follow safety-first installation practices: verify power is off, use GFCI protection, run proper gauge wiring, secure mounting brackets every 6–8 feet, and consider hiring a licensed electrician if running new electrical lines from your home’s panel.
- A well-designed patio lighting system increases your home’s perceived value and is one of the smartest outdoor upgrades you can invest in for both daily enjoyment and long-term property appeal.
Why Proper Lighting Transforms Your Covered Patio
Lighting does three jobs on a covered patio: it provides safety, establishes ambiance, and extends your usable hours. Without it, you’re confined to daylight, and that’s wasted potential. Proper lighting eliminates tripping hazards, makes seating areas inviting, and creates visual definition in the space.
The challenge is balance. Too bright, and your patio feels like a parking lot. Too dim, and guests stumble into furniture. Layering different types of fixtures, overhead, accent, and task lighting, gives you control and flexibility. You can dim pendant lights for an intimate dinner, switch on recessed fixtures for game night, or use wall sconces to highlight architectural features.
A well-lit patio also increases your home’s perceived value. Potential buyers see an outdoor living space that’s complete and ready to use, not an afterthought. Even for your own enjoyment, investing in quality covered patio lighting is one of the smartest upgrades you can make.
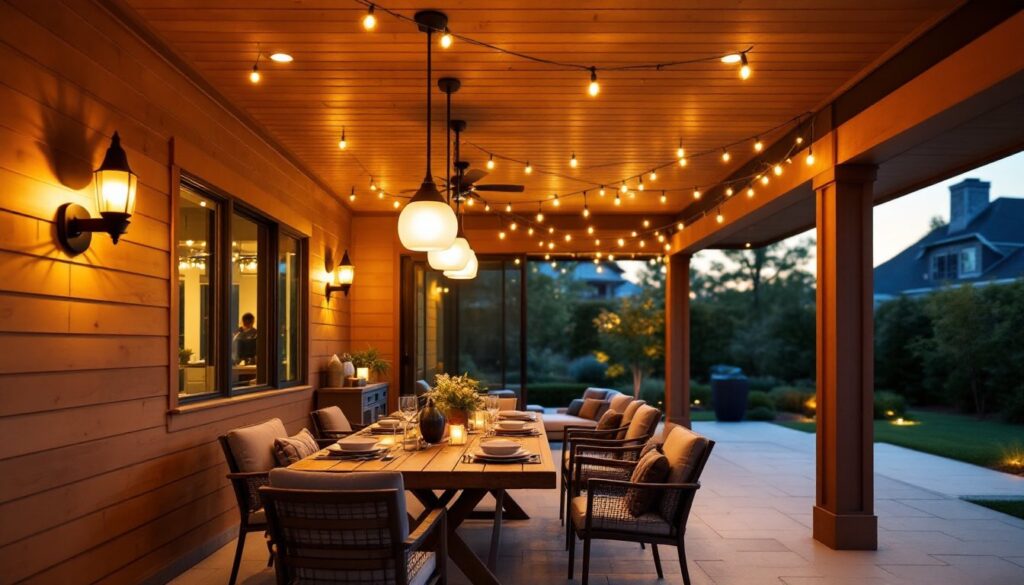
Types of Covered Patio Lighting Fixtures
Recessed and Flush Mount Lights
Recessed lights sit flush with the ceiling, offering a clean, uncluttered look. They work especially well on covered patios because they don’t hang down and obstruct headspace. Most recessed fixtures accept standard 4-6 inch trims and can accommodate LED, halogen, or incandescent bulbs. LED is the smart choice here, longer lifespan, less heat, and lower energy costs.
Flush mounts sit directly on the ceiling surface, ideal if your patio ceiling is solid or if recessed installation isn’t feasible. They’re simpler to install than recessed fixtures and offer clean, modern lines. Both types provide distributed overhead light without focal points, making them perfect for foundational, ambient lighting.
For a covered patio, choose damp-rated or wet-rated fixtures depending on your roof design and exposure. Damp-rated handles occasional moisture: wet-rated handles direct water contact. Check the fixture label and your local building code, some jurisdictions require specific ratings for different areas.
A useful resource on recessed lighting design can guide your fixture spacing and wattage calculations.
String Lights and Bistro Lighting
String lights and bistro configurations are the mood-makers. Bistro lights (also called café lights or Edison strings) use small incandescent or LED bulbs spaced along a cable, often in a zigzag or draped pattern. They’re warm, inviting, and instantly elevate the aesthetic.
String lights come in permanent or temporary installations. Permanent runs use weatherproof cables and dedicated supports. Temporary setups use hooks or clips and can be repositioned seasonally. If you’re installing permanently, secure cables to solid structure points and account for sag, don’t over-tighten, which creates stress on mounting hardware.
LED bistro strings are energy-efficient and safer than traditional incandescent versions, which generate heat. If you have a wood or fabric ceiling, stick with cool-burning LEDs to avoid fire hazards. String lights rarely provide enough light alone: pair them with recessed or flush fixtures for task lighting.
Wall Sconces and Pendant Lights
Wall sconces mounted on patio columns or walls deliver both ambient and accent lighting. They’re available in countless styles, from industrial Edison cages to sleek modern boxes, and can highlight architectural elements while adding warmth to seating areas. Sconces work best in pairs or groupings, positioned at 60-66 inches from the floor for even illumination without glare.
Pendant lights hang from the ceiling and are perfect for dining areas or feature zones. A row of 3-5 pendants over a dining table creates visual interest and task lighting. Pendants with downward-facing shades direct light where you need it and reduce overhead glare. Match pendant height to your patio size: larger spaces handle bigger, bolder fixtures.
More details on outdoor wall lighting options can help you narrow down styles that suit your home’s architecture.
Planning Your Patio Lighting Layout
Start by mapping your patio. Measure width, depth, and ceiling height. Identify zones: dining area, conversation nook, entry point, and any focal features (a fireplace, water feature, or architectural detail). Each zone should have its own lighting strategy.
Calculate foot-candles, a measure of light intensity. A covered patio dining area typically needs 20-30 foot-candles for comfortable visibility. Ambient seating areas work at 5-15 foot-candles. Don’t guess: many fixtures specify output in lumens, which helps. As a baseline, a 60-watt equivalent LED produces roughly 800 lumens and covers about 4×4 feet when recessed at 8-foot height.
Grouping is key. Avoid one big light in the middle, it creates harsh shadows and dark corners. Instead, distribute fixtures across the ceiling. If your patio is 12×16 feet, a grid of four recessed lights (one in each quadrant) plus wall sconces and accent lights will feel balanced and functional.
Consider dimmers. Not every moment calls for full brightness: dimmers let you adjust mood without replacing fixtures. Most LED fixtures support dimming, check the bulb and dimmer compatibility when shopping. Dimmers are simple to retrofit if your patio already has wired overhead lights.
Think about color temperature. Warm white (2700K) feels cozy and residential. Cool white (4000K) is more neutral and energetic. For patios, warm tones are typically preferred, but test samples if you’re unsure. Mixing color temperatures creates visual chaos, so pick one and stick with it.
Installation Tips for Homeowners
Before you start, turn off power at the circuit breaker and verify it’s off with a voltage tester. No exceptions. If your patio isn’t already wired, this is a bigger job, you’ll need to run electrical from your home’s panel, and many jurisdictions require a licensed electrician and a permit. Don’t skip this step.
For recessed light installation:
- Locate joists or studs with a stud finder. Recessed fixtures need proper framing clearance (typically 3 inches from insulation).
- Cut a hole using the template provided with your fixture (usually 4-6 inches in diameter).
- Secure the housing to the joist using the provided brackets.
- Run wiring from your junction box through the housing.
- Connect the fixture’s terminal block to your supply wire using wire nuts, then push the trim ring into place.
- Install the bulb and trim.
For flush mounts and wall sconces, you’re likely working with existing wiring or running new cable along the ceiling/wall. Follow similar junction box connection procedures. Use appropriately rated wire for outdoor locations, 14 AWG for 15-amp circuits, 12 AWG for 20-amp circuits.
String light and pendant installation:
For permanent bistro strings, mount brackets to structural points (beams, posts, or walls) every 6-8 feet. Use toggle bolts or masonry anchors if fastening to drywall or block. Secure the cable but allow minimal sag, 1-2 inches per 10 feet of span is typical. Wrap connections with weather-resistant tape or use waterproof junction boxes.
Pendants are suspended from a beam or ceiling fixture and connected to a junction box rated for the fixture’s weight. Always ensure your mounting point can handle the load, check the fixture’s weight specification and confirm your hardware (bolts, brackets) can support it.
Safety and code tips:
- Use GFCI outlets and circuit protection for any patio electrical work. Many jurisdictions mandate GFCI for outdoor circuits as per the National Electrical Code (NEC).
- Ground all metal frames and mounting hardware, especially on metal patios or decks.
- Use only damp-rated or wet-rated fixtures for covered patios: standard interior fixtures fail outdoors.
- If you live in a high-wind area, ensure brackets and supports are reinforced.
Alternatives and shortcuts: If full ceiling rewiring isn’t in your budget or skill set, consider solar pathway lights, LED spotlights on stakes, or even plug-in string lights on extension cords. They’re not permanent solutions, but they buy time while you plan a more comprehensive install. Review outdoor ceiling lighting best practices for additional insight on fixture selection and mounting.
For detailed step-by-step guidance on home projects, Bob Vila’s site offers contractor-level advice and Family Handyman provides user-friendly tutorials. Both are solid references when you hit a snag. Avoid common mistakes: don’t over-tighten fasteners (you’ll crack trim or damage the fixture), don’t assume existing wiring is adequate (have an electrician verify), and don’t skip weatherproofing connections (water finds every gap).

