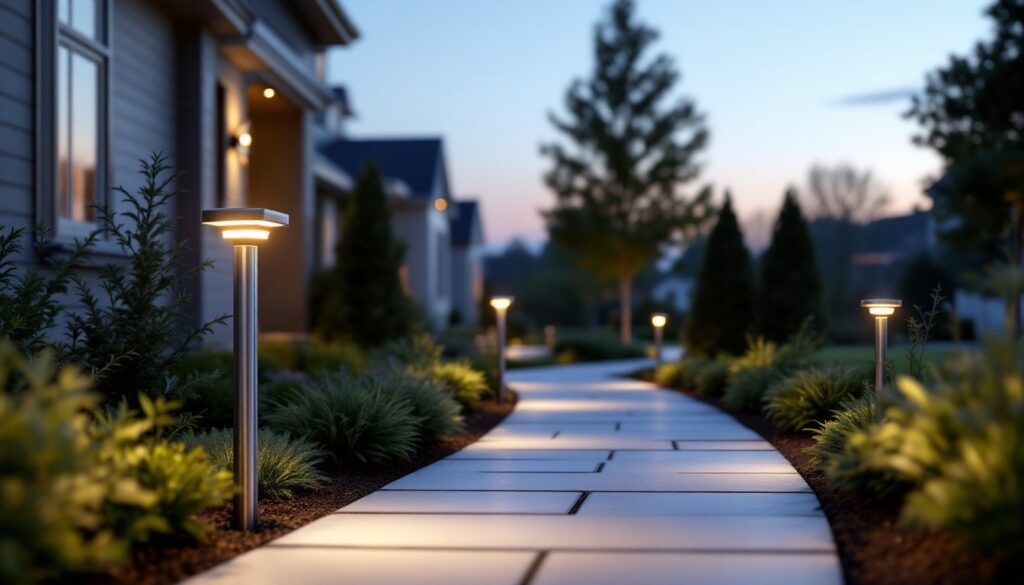
Adding solar path lighting to your outdoor space transforms a dark yard into a welcoming, safe environment, without racking up electricity bills. Solar path lights have come a long way from those dim, plastic novelties of years past. Today’s models offer genuine brightness, sleek designs, and reliable performance that even skeptical homeowners appreciate. Whether you’re lighting a walkway, garden beds, or a patio perimeter, solar path lighting delivers function and curb appeal in one clean package. This guide walks you through everything you need to know to choose, install, and maintain solar path lights that’ll actually work.
Table of Contents
ToggleKey Takeaways
- Solar path lighting requires zero installation complexity—no trenches, electrical lines, or licensed electricians needed, making it ideal for homeowners and renters seeking flexibility.
- Modern solar path lights use energy-efficient LEDs that draw only 0.5–2 watts compared to traditional landscape lights using 20+ watts, delivering 6–10 hours of runtime on a single charge.
- Quality matters: invest $20–$35 per light with IP67 ratings, 2000+ mAh batteries, and durable materials like stainless steel to avoid cheap fixtures that fail within a season.
- Proper installation requires 6+ hours of daily direct sunlight, clear panels from debris, and a 2–3 day charging period before expecting full nighttime performance.
- Avoid common mistakes like underestimating winter performance, placing lights in shade or near obstacles, and neglecting regular panel cleaning—these directly impact brightness and battery longevity.
Why Solar Path Lighting Is Perfect for Modern Homeowners
Solar path lighting ticks boxes that traditional hardwired outdoor lighting doesn’t. First, there’s zero installation complexity, no digging trenches, running electrical lines, or hiring a licensed electrician. You pop the stake in the ground, and you’re done. That means no permits, no compliance headaches with local building codes, and no rewiring if you change your mind about placement.
Second, the operating cost is genuinely zero once you buy the fixtures. Your lights charge during the day from the sun and run all night on that stored energy. Over a season, that adds up to real savings compared to low-voltage or line-voltage outdoor lighting systems. Third, solar path lights are forgiving of mistakes. Unlike hardwired systems, a failed light doesn’t kill an entire circuit, you simply swap out one fixture. For renters and homeowners who like flexibility, that’s huge.
Modern solar path lights also address the old complaints. Battery technology has improved dramatically, so even in winter or cloudy regions, a decent solar light holds a charge. And you’ll find designs that look more like real outdoor lighting and less like a gas station attendant’s glow-stick collection.
How Solar Path Lights Work and Why They’re Energy Efficient
A solar path light is essentially a tiny, self-contained renewable energy system. During daylight, a photovoltaic (PV) cell, that’s the small panel on top, converts sunlight into electrical current. That current charges an internal rechargeable battery (usually lithium-ion or nickel-metal hydride). When darkness falls, a light sensor triggers the LED to draw power from the battery and illuminate your path all night.
The efficiency comes from several factors. LEDs use a fraction of the power that incandescent or halogen bulbs demand. A typical solar path light’s LED draws 0.5 to 2 watts, while a traditional landscape light might pull 20 watts or more. That’s why a small battery can power an LED all evening on one day’s solar charge. Modern batteries also lose less charge over time than older alkaline cells. A quality solar path light should deliver 6–10 hours of runtime on a full charge, even as seasons change.
One honest note: solar path lights don’t work as hard in winter or in perpetually cloudy climates. Reduced daylight hours mean less charging time. In those environments, you’ll want lights with larger panels and higher-capacity batteries, or space them closer together to accept lower brightness. This is exactly where many DIYers get frustrated, they buy cheap lights expecting full performance everywhere and get disappointed.
Choosing the Right Solar Path Lights for Your Garden
Before you buy, nail down what you actually need. Start by measuring your pathway and deciding on spacing. Most homeowners place lights 4–6 feet apart along a walkway: closer spacing creates a more polished look and better safety lighting, while wider spacing is budget-friendly and works fine for subtle illumination.
Next, visit garden centers or check online reviews on Gardenista’s roundup of solar pathway lanterns and lighting. Real user feedback on brightness, battery longevity, and build quality matters far more than marketing claims. Pay attention to reviews from people in your climate zone.
Material durability is underrated. Plastic lights are lighter and cheaper but degrade in UV sunlight over 2–3 years. Stainless steel and brushed aluminum fixtures cost more upfront but handle weather better and look better as they age. Check the product specs for IP rating, IP67 is waterproof and dustproof: IP65 is water-resistant but not fully submersible. In wet climates or near sprinkler zones, IP67 is worth the extra cost.
Battery capacity matters too. Look for mAh (milliamp-hour) ratings on the product page. A 1000–1500 mAh battery is entry-level: 2000+ mAh lights hold charges longer and perform better in winter. Expect to pay $15–$40 per light for quality: cheaper lights often fail within a season.
Brightness and Coverage Considerations
Lumens measure brightness. A 20–30 lumen light works for gentle pathway marking: 50+ lumens delivers real illumination for safety and navigation. The trade-off is that higher lumens drain the battery faster, so your light might run 4–5 hours instead of 10 hours.
Consider the beam pattern too. Some lights cast light straight down (good for a narrow path), while others spread light sideways (better for highlighting garden beds). Walk your path at dusk and imagine where shadows fall: that’s where you want brightest coverage. For patios, layering is smart: use bright path lights along the perimeter, then add softer ambient lighting from overhead or wall-mounted fixtures. This creates depth and functionality without washing out the space with glare.
Color temperature also affects mood. Warm white (2700K) feels inviting and is easier on the eyes at night: cool white (4000K+) looks modern but can feel harsh. Most path lights come in warm white by default, which works for most yards.
Installation Tips for Maximum Performance
Installation is simple, but a few details make the difference between “barely works” and “works great year-round.”
Site selection is critical. Choose spots that get 6+ hours of direct sun daily. Partial shade works, but your runtime drops noticeably. Avoid placing lights under trees or near structures that cast long afternoon shadows. If your yard is mostly shaded, solar path lighting might not be your best bet, consider hardwired low-voltage lights or accept shorter runtime during cloudy seasons.
Before pushing stakes into the ground, clear the area of debris and weeds. Vegetation around the light blocks sunlight from reaching the panel. Also, wiggle any existing mulch or gravel away from the light’s base so air can circulate and moisture can dry quickly. Wet soil promotes rust and corrosion at the stake connection.
Don’t install lights on arrival day. Let the batteries charge fully in daylight for at least 2–3 days before expecting full nighttime performance. Many DIYers complain about weak lights because they install them fresh from the box and expect eight hours of brightness immediately, that’s not realistic. The battery needs a few cycles to stabilize.
For pathways, space lights evenly and drive stakes perpendicular to the ground, not at angles. Angled stakes shift in wind and freeze-thaw cycles. If your soil is hard, pre-drill a small pilot hole with a hand auger or even a screwdriver to guide the stake. Forcing a stake can crack the light housing or bend the stake connector. Some sources on outdoor ceiling lighting and landscape design discuss layering light types, path lights work best paired with ambient or accent lighting for full-yard coverage.
Check back after two weeks. Ensure lights haven’t shifted and are still in full sun. Adjust as needed. A light that gradually moves into shade will underperform as the season progresses.
Common Mistakes to Avoid When Setting Up Solar Lighting
First mistake: buying cheap lights and expecting them to perform like premium fixtures. A $5 light from a big-box store will probably fail or deliver dismal brightness. Budget $20–$35 per light and you’ll get reliability. That upfront cost pays for itself in avoided replacements.
Second: not accounting for seasonal changes. Most homeowners test lights in summer when daylight is abundant, then complain in winter when battery depletion accelerates. Plan for winter performance, buy lights with higher capacity batteries if you live in a cold or cloudy region. Or accept that lights will run shorter hours October through March.
Third: overcrowding fixtures or placing them in shade. Light from a neighboring tree or building can fool the sensor into thinking it’s still dusk, causing lights to run longer and drain the battery. Space lights with full sun in mind and prune nearby branches if needed.
Fourth: ignoring water intrusion and poor drainage. If you install lights in a low spot that pools water after rain, moisture will seep into the battery compartment and cause corrosion or short circuits. For poorly draining yards, consider raised beds or mounding soil slightly around light locations. Modern solar lights are water-resistant but not bulletproof, drainage matters.
Fifth: not replacing batteries when they fail. A solar light might physically work for years but deliver only 2–3 hours of light because the battery has degraded. Most lights use standard AA or AAA rechargeable batteries, which cost $3–$8 to replace. Check specs when buying: if the manufacturer doesn’t list the battery type, avoid that brand, you’ll be stuck replacing the whole light.
Sixth: forgetting to clean light panels. Dust, pollen, and leaf debris reduce the panel’s efficiency. Every few months, especially in fall, give your lights a gentle wipe with a dry cloth. In harsh climates, quarterly cleaning keeps performance consistent. This single step is overlooked by most DIYers and directly impacts nighttime brightness.
Conclusion
Solar path lighting is one of the smartest, lowest-fuss additions to any outdoor space. It requires no electrical work, no permits, and minimal maintenance. The technology has matured enough that you can count on solid performance if you buy quality fixtures, place them correctly, and keep panels clean. Start with a small section, say, your front walkway, to test performance in your specific climate and light conditions. Once you’re confident, expand to garden beds, patios, or along a deck. Your yard will be safer and more inviting, and your power bill won’t budge.

