If you’ve got older recessed lighting with outdated halogen or incandescent trim rings, a retrofit conversion kit might be the simplest upgrade you can make this year. A 6″ LED recessed lighting retrofit conversion kit swaps out just the trim and LED module, no need to rip out your existing housing or hire an electrician. Homeowners typically see lower electricity bills, brighter light, and better color options within an afternoon of work. This guide walks you through what these kits are, why they matter, and how to install one yourself.
Table of Contents
ToggleKey Takeaways
- A 6″ LED recessed lighting retrofit conversion kit replaces only the trim ring and LED module while keeping your existing housing can, making it faster and cheaper than a full fixture replacement.
- LED retrofits use 10–15 watts compared to 60 watts for old halogen trims, saving homeowners $180–$240 per year on electricity in a single room, plus rebates from many utility companies.
- Modern LED recessed lighting retrofits offer adjustable color temperatures (warm, neutral, or daylight), dimming compatibility, and longer lifespans of 25,000–50,000 hours versus 2,000–5,000 hours for halogen.
- DIY installation takes just a few hours and requires no electrician—simply turn off the breaker, remove the old trim, disconnect the old bulb, install the new LED module, and secure the trim ring.
- Safety is critical: always verify power is off with a voltage tester, let old fixtures cool for 10–15 minutes, use proper safety gear, and stop if you encounter deteriorated wiring or damaged housing cans.
What Is A 6″ LED Recessed Lighting Retrofit Conversion Kit?
A retrofit conversion kit is a plug-and-play replacement for the interior trim and light source of an existing recessed fixture. The 6-inch measurement refers to the rough opening (the hole cut into your ceiling during the original installation).
Inside that rough opening, there’s a metal housing can, typically aluminum or steel, that was installed between joists above your ceiling. A retrofit kit lets you keep that housing and simply replace the trim ring and halogen or incandescent bulb with a new LED trim ring and module. The LED module usually clicks or screws into the existing housing, and the trim ring snaps or screws into place from below.
This differs from a full recessed light replacement, where you’d remove the entire housing can. Retrofits are faster, cheaper, and less disruptive because there’s no fishing wires, cutting new holes, or patching drywall. Most kits are designed to be damp-location rated (safe in bathrooms and kitchens) and compatible with standard 6-inch cans.
Why Upgrade To LED Recessed Lighting Retrofits
Two big reasons stand out: energy savings and better light quality.
Energy Savings And Lower Electricity Bills
A typical old 60-watt halogen trim uses about 60 watts per hour: a modern LED retrofit uses 10 to 15 watts for the same or better brightness. If you’re running recessed lights for 4–5 hours daily across, say, 12 fixtures, you’re looking at roughly $15 to $20 per month saved on electricity alone. Over a year, that’s $180 to $240 in a single room, and the retrofit kit itself often costs less than $100 per fixture.
LED modules also have a lifespan of 25,000 to 50,000 hours (roughly 10–20 years at moderate use), compared to 2,000–5,000 hours for halogen. You’ll replace far fewer bulbs, which adds up over time. Many utility companies also offer rebates on LED retrofits, so check your local provider before purchasing.
Improved Brightness And Color Options
Older trim designs sometimes created shadows or pooled light unevenly. Modern LED recessed lighting retrofit kits offer adjustable color temperature (2700K for warm, 4000K for neutral, 5000K for daylight-crisp), dimming compatibility, and more uniform beam patterns. You’re not locked into one yellow-orange glow anymore.
Many homeowners also find that LED retrofits allow them to mix and match fixtures by color temperature, warm white in bedrooms, cooler tones in kitchens or offices. That flexibility is something you don’t get with halogen, and it can genuinely improve how a space feels.
Installation Basics For DIY Homeowners
The good news: installing a retrofit kit doesn’t require an electrician in most cases, as long as you’re confident turning off a breaker and working safely at height.
Tools And Materials You’ll Need
Tools:
- Flathead screwdriver
- Phillips screwdriver
- Stepladder or stable platform (never stand on a regular chair or wobbly surface)
- Flashlight or headlamp (working in a ceiling cavity is dark)
- Wire strippers (if you need to adjust existing wiring, rare, but good to have)
Materials:
- Your retrofit conversion kit (includes trim ring, LED module, and usually a mounting clip or bracket)
- Wire nuts or connectors (if not included in the kit)
Safety gear:
- Safety glasses or goggles to protect against dust and debris falling from above
- Work gloves (drywall and metal trim edges are sharp)
- Optional but recommended: a dust mask, as insulation or old materials in the ceiling can kick up particles
Step-By-Step Installation Process
Step 1: Turn off the power. Locate the breaker controlling your recessed lights and switch it off. Test the fixture with a non-contact voltage tester or switch the wall dimmer on and off to confirm power is gone. This is non-negotiable for safety.
Step 2: Let existing fixtures cool. If the lights were on, wait 10–15 minutes. Halogen trims get very hot and can cause burns or damage new LED components if touched while hot.
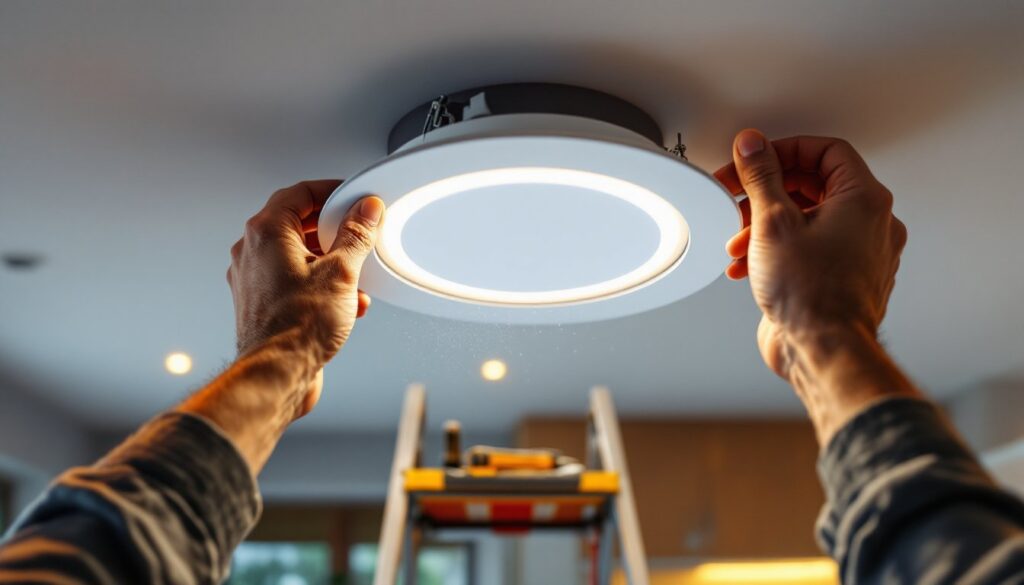
Step 3: Remove the old trim. Most trims are held by a friction ring or clips inside the housing. Gently pull the trim ring straight down and out of the can. If it’s stubborn, a flathead screwdriver can help pry the friction ring slightly. Some trims screw in: if so, unscrew counterclockwise.
Step 4: Disconnect the halogen or incandescent bulb. If there’s a connector plug, unplug it. If wires are soldered or capped, use a wire stripper to separate them (you likely won’t need these old wires). Take a photo of the wiring before you disconnect it, just for reference.
Step 5: Install the LED module. The new LED module typically has a small bracket or clips that mount to the existing housing can. Align the module with the mounting points inside the can and push or click it firmly into place. Some kits screw in: follow your kit’s instructions. Ensure the module is centered and secure.
Step 6: Connect wiring. Strip the ends of any exposed wires (usually black, white, and bare copper) about ½ inch. Match black to black, white to white, and copper to copper using wire nuts or connectors. Twist each pair clockwise until tight, then cap with a wire nut and twist until snug. Tuck wires neatly up into the housing cavity to avoid interference with the trim ring.
Step 7: Install the LED trim ring. Slide the new trim ring into the housing, making sure it seats evenly. Some rings have a friction ring that grips from inside: others have mounting screws. Follow your kit’s instructions. The trim should sit flush with the ceiling, no gaps or tilting.
Step 8: Test the fixture. Turn the breaker back on and test the light. It should turn on smoothly. If you’ve got a dimmer, test dimming from 0% to 100%. Most LED kits are dimmable down to 10% without flickering, but read your product specs.
Step 9: Repeat for other fixtures. If you’re upgrading multiple lights, repeat steps 1–8 for each one. Many homeowners do one circuit at a time to avoid working in total darkness.
If you encounter wiring that’s deteriorated, crumbling insulation, or anything that looks unsafe, stop and consult a licensed electrician. Similarly, if your housing can is damaged or missing, you’ll need a full fixture replacement, not a retrofit. Always reference your specific kit’s instructions, some manufacturers have slightly different mounting or wiring procedures, and following their exact steps ensures warranty coverage and safety.
Final Thoughts
A 6-inch LED recessed lighting retrofit is one of the quickest, most rewarding upgrades a DIYer can tackle. You’ll save money on electricity, get better light quality, and enjoy fixtures that last 10–20 years instead of a few. Just respect the power, turn off the breaker, work safely at height, and don’t force any connections. If you’re upgrading multiple rooms, resources like ImproveNet can help you estimate costs and connect with contractors if you need backup. With a retrofit kit and a couple of hours, your home’s lighting will feel completely refreshed.

