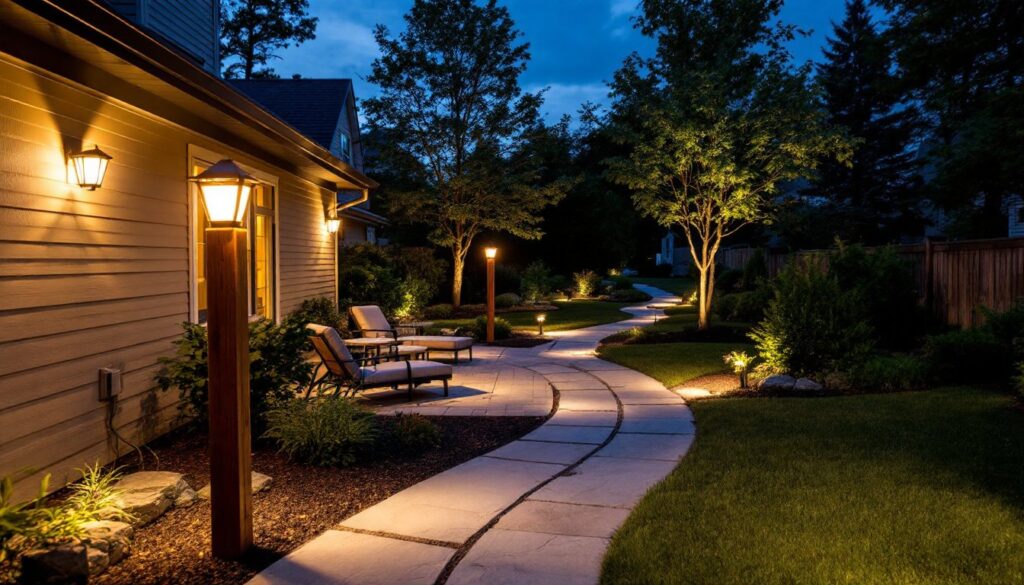
When darkness falls, your yard doesn’t have to disappear. Alliance outdoor lighting brings professional-grade illumination to residential spaces, turning backyards into functional, inviting areas that extend your living space well after sunset. Whether you’re looking to light a pathway for safety, create ambient mood lighting for entertaining, or highlight landscape features, Alliance offers reliable solutions that homeowners can install without very costly. Understanding the range of products available and how to deploy them properly is the difference between a yard that’s merely lit and one that’s beautifully illuminated.
Table of Contents
ToggleKey Takeaways
- Alliance outdoor lighting combines professional-grade illumination with DIY-friendly, affordable installation, eliminating the need for costly electricians or permits in most residential applications.
- Pathway lights and landscape fixtures serve distinct purposes: low-voltage pathway lights (12V, 50–150 lumens) handle safety and accent lighting, while higher-output ambient fixtures (120V, 400–1200+ lumens) illuminate larger entertaining areas.
- Proper layering of ambient, task, and accent lighting—combined with strategic placement and warm color temperatures (2700K–3000K)—creates a professionally designed outdoor space rather than one-dimensional illumination.
- DIY installation requires only basic materials (transformer, low-voltage cable, wire connectors) and involves staking lights into soil and connecting push-fit connectors; avoid common mistakes like voltage drop, overloading circuits, and exposing cable to UV damage.
- LED technology in Alliance fixtures lasts 25,000+ hours (10–15 years), runs cool to the touch, and requires minimal maintenance—just annual inspections of cable connections, lens cleaning, and seasonal drainage in freezing climates.
- Start small with pathway lights and expand your outdoor lighting design over time, integrating new fixtures as your landscape evolves rather than treating installation as a one-time project.
What Is Alliance Outdoor Lighting and Why It Matters for Your Home
Alliance outdoor lighting refers to a comprehensive line of outdoor fixtures designed for residential use, pathway lights, accent luminaires, landscape spotlights, and ambient fixtures that emphasize durability and performance. Unlike generic “outdoor lighting,” Alliance products are engineered specifically for long-term exposure to weather, UV radiation, and temperature swings. They’re a middle-ground choice: more reliable than basic hardware-store fixtures, but less expensive and labor-intensive than full landscape lighting installations requiring licensed electricians.
Why does this matter? Poor outdoor lighting creates safety hazards (tripping on unlit steps, dark entryways), limits your ability to use outdoor space after dark, and can actually reduce home security by leaving shadows where intruders could hide. Proper illumination also enhances curb appeal and can make your home feel more welcoming. Alliance products achieve this without demanding constant maintenance or replacement every season. When you’re deciding whether to tackle outdoor lighting yourself, Alliance’s balance of affordability, durability, and user-friendly installation makes it a practical starting point for most DIYers.
Types of Alliance Outdoor Lighting Products for Every Space
Alliance’s product range falls into distinct categories, each serving a specific function. Understanding these types helps you choose the right tool for each area of your yard.
Pathway and Accent Lights
Pathway lights are low-voltage, ground-level fixtures typically 12 to 24 inches tall that line walkways, driveways, and garden beds. They’re the workhorse of residential outdoor lighting. Most Alliance pathway lights run on 12-volt DC power supplied by a transformer, which means installation is straightforward, no trenching for 120-volt circuits or permits required in most jurisdictions. Stake them into soil, connect the wires (usually push connectors), and you’re done. Accent lights, meanwhile, focus narrow beams on specific features: a tree trunk, a planter, or architectural detail. These often use LED (light-emitting diode) technology, which is energy-efficient and lasts 25,000+ hours, roughly 10 to 15 years of typical residential use. Unlike older halogen pathway lights, LEDs stay cool to the touch and produce minimal heat, reducing fire risk and allowing you to use them near plants or furniture.
Landscape and Ambient Fixtures
Landscape and ambient fixtures are larger, higher-output luminaires that illuminate broader areas. Think post-top lights mounted on a 4 by 4 post at 8 to 10 feet high, or wall-mounted sconces that cast light across a patio. These typically require 120-volt power (standard household current) and may need a permit depending on local codes, especially if you’re running new circuits. But, many DIYers skip the permit for single fixtures if they’re wired to an existing outdoor outlet with a GFCI (ground-fault circuit interrupter) breaker. Outdoor ceiling lighting is a subset of this category, perfect for covered patios or pergolas where you want broader illumination. Outdoor wall lighting also fits here, providing ambient glow while freeing up ground space. Alliance landscape fixtures typically emphasize clean, durable construction, powder-coated aluminum or stainless steel, that resists rust in coastal or humid climates. Many homeowners pair pathway lights with one or two larger ambient fixtures to create layered lighting, which gives a yard depth and interest.
Installation Tips and Best Practices for DIY Projects
Before you break out the shovel and wire strippers, gather your materials and plan the installation in daylight.
Materials Checklist:
- Low-voltage transformer (for 12V pathway lights)
- Low-voltage cable (usually 12 or 10 gauge: thicker wire = longer runs without voltage drop)
- Wire connectors (push-fit or crimp-on)
- Wire cutters and a flathead screwdriver
- Landscape gloves and work boots
- Safety glasses
Installation Steps:
-
Plan and mark the layout in daylight. Walk the path you want to light and mark spots with spray paint or stakes every 4 to 6 feet. Step back and visualize the effect, this saves you from moving lights after installation.
-
Run the cable from the location of your transformer (typically near an outdoor outlet or a dedicated outdoor breaker) along the pathway or garden bed. Bury the cable 4 to 6 inches deep in soil or run it along the edge under mulch if trenching isn’t practical. Avoid running it under high-traffic areas where foot traffic or future digging could damage it.
-
Install the transformer in a dry location: under an eave, in a garage, or in a weatherproof junction box. Most residential transformers are rated for 600 to 1200 watts and convert 120V household current to 12V DC. Plug it into a GFCI-protected outlet or wire it directly to a dedicated circuit if you’re comfortable with basic electrical work.
-
Connect lights to the cable using the push connectors provided. Most Alliance pathway lights have two spikes on the back: push them firmly through the insulation of the cable, the connectors pierce the wire and make contact automatically. No stripping or soldering needed.
-
Test and adjust before backfilling. Turn on the transformer and walk the path at dusk to see if brightness is even. If lights at the far end seem dim, you may have voltage drop, move the transformer closer or use thicker cable on the next section.
Common mistakes to avoid: Don’t daisy-chain too many lights on one cable run (check the transformer’s wattage rating to avoid overload). Don’t leave cable exposed above ground for extended periods, UV exposure degrades insulation. And outdoor stair lighting requires special attention: mount fixtures on the riser (vertical part) or tread (horizontal part) where they’re secure and won’t become tripping hazards. Verify that your local building code permits 12V low-voltage systems without inspection: some jurisdictions don’t, while others require only a permit if the transformer is hard-wired rather than plugged in.
Designing Your Outdoor Lighting Layout for Maximum Impact
Thoughtful design makes the difference between adequate lighting and a genuinely attractive outdoor space. Start by asking: What do I want to see and do in my yard after dark? Are you creating a safe path to the front door, lighting a seating area for evening conversations, or highlighting landscape features like shrubs or a water feature?
Layering is the professional approach. Combine three types of light: ambient (general illumination, like post-top or ceiling lights), task (focused beams for reading or cooking), and accent (highlighting plants or architecture). A typical residential layout might include pathway lights running from the driveway to the front entrance (ambient + task), a ceiling light on a covered patio (ambient), and a few spotlights angled at shrubs or a fence (accent). This mix prevents the harsh, one-dimensional effect of a single bright fixture.
Brightness matters. Pathway lights typically output 50 to 150 lumens, enough to see the ground but not so bright you’re blinded walking out your door. Ambient fixtures for a patio might range from 400 to 1200 lumens depending on area size. If you’re uncertain, start conservative: it’s easier to add another light than to shield one that’s too bright.
Color temperature also affects mood. Warm white (2700K to 3000K) is cozy and flattering for outdoor seating areas. Cool white (4000K to 5000K) is more clinical but useful for security or task lighting. Many Alliance fixtures offer both options, check the product specs before purchasing. Recent smart home technology reviews highlight color-adjustable outdoor lighting as an emerging trend, allowing you to shift from warm for entertaining to cool for security mode.
Consider sightlines. Avoid pointing lights directly at where people sit or at windows where light spills indoors. Angle accent lights upward into trees or downward at ground-level features. This technique, called “uplighting” and “downlighting,” creates visual interest while minimizing glare.
Maintenance and Care to Keep Your Lights Performing
Alliance outdoor lighting is built for durability, but a little preventive care extends its lifespan and keeps it looking sharp.
Annual checks:
- Inspect cable connections for corrosion, especially in coastal areas where salt air accelerates degradation. Tighten push connectors or replace them if they’re loose or showing white crusty buildup (oxidation).
- Clear debris (leaves, dirt, grass clippings) from fixture lenses and vents. Dust reduces brightness and traps moisture, accelerating wear.
- Test each light by turning on the transformer at dusk. Replace any LED bulbs or modules that don’t illuminate. LED modules are often integrated into the fixture housing: if one fails, you may need to replace the entire unit, though quality Alliance fixtures allow modular replacement.
Seasonal prep:
- Before winter, drain water from post-top fixtures if your region freezes. Standing water expands when frozen and can crack housing.
- In humid climates, consider applying a light coat of clear silicone sealant to aluminum connections to resist moisture intrusion.
Cable care:
- In areas with freezing cycles, inspect buried cable every few years. Soil heave (frost-induced shifting) can expose cable or crimp it. If you find exposed sections, bury them deeper or cover with conduit.
- Don’t bury cable where roots or future digging might damage it, under trees or near garden beds where you rotate plantings.
Landscape design tip: Alliance outdoor lighting integrates well with garden design ideas that emphasize texture and layering. As you upgrade your yard over time, adding new plantings, a fire pit, or a seating wall, your lighting should evolve too. Don’t treat it as a one-time installation: think of it as a foundational layer that supports your landscape vision.
Bringing It All Together: Your Path Forward
Alliance outdoor lighting isn’t magic, but it transforms how you experience your yard. With clear planning, straightforward installation, and basic annual maintenance, even a novice DIYer can create professional-looking results. Start small if you’re uncertain, add pathway lights this season, a patio fixture next year. The skills you develop installing one light carry over to the next, and you’ll quickly build confidence. Your yard doesn’t have to go dark when the sun sets.

