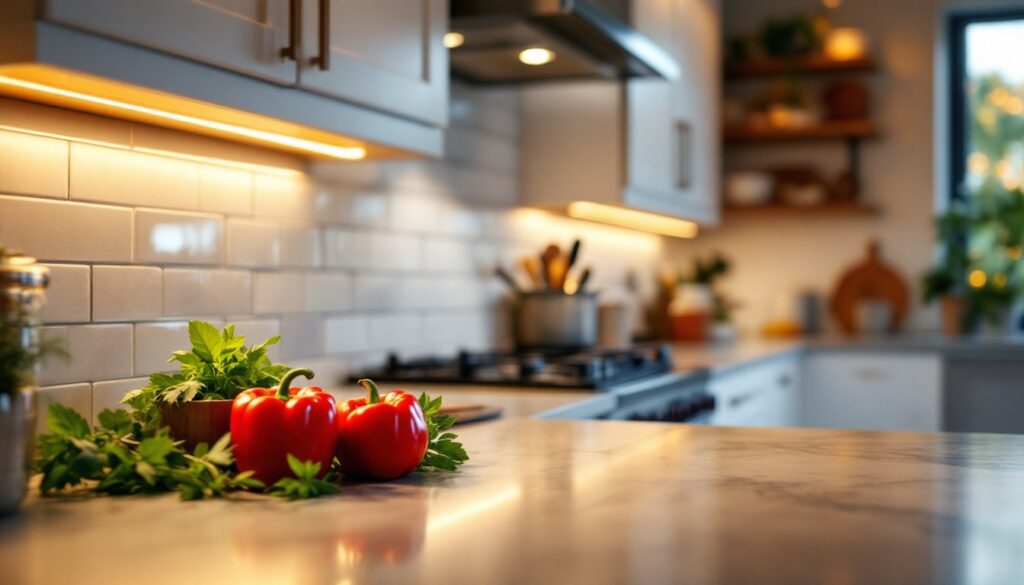
Thin under cabinet lighting might seem like a luxury upgrade, but it’s one of the most practical investments a homeowner can make. It transforms a dark, shadowy countertop into a functional workspace while adding warmth and visual appeal to your kitchen. Whether you’re prepping dinner or just grabbing a late-night snack, proper task lighting makes the work safer and more enjoyable. The good news? Today’s slim, efficient LED options make installation simple enough for most DIYers. Let’s explore what works best for your kitchen layout and budget.
Table of Contents
ToggleKey Takeaways
- Thin under cabinet lighting eliminates shadows on countertops, improving both safety and functionality while adding aesthetic warmth to your kitchen.
- LED strip lights offer continuous, cost-efficient coverage starting at $15–$50 per run, while puck lights provide targeted illumination spaced 12–18 inches apart for flexibility.
- Proper installation requires cleaning mounting surfaces, secure adhesion, and hidden power cord routing, with hardwired systems requiring a licensed electrician.
- Color temperature (warm white at 2700K–3000K for comfort, neutral white at 4000K–4100K for tasks) and brightness of 300–500 lumens per linear foot directly impact both functionality and ambiance.
- Budget options ($30–$80) provide reliable task lighting, while mid-range ($80–$200) systems add dimming and smart home integration for enhanced control and convenience.
- Compare specifications like lumen output and color temperature across brands rather than price alone to ensure your thin under cabinet lighting matches your kitchen’s needs and design.
Why Thin Under Cabinet Lighting Transforms Your Kitchen
Shadows under cabinets are more than just an eyesore, they’re a genuine safety hazard. When you’re chopping vegetables or reading a recipe, dark countertops slow you down and increase the risk of accidents. Thin under cabinet lighting eliminates those shadows and provides direct, even illumination exactly where you need it.
Beyond function, this lighting adds significant aesthetic value. A warm glow highlights countertops, backsplash, and cookware, making your kitchen feel larger and more inviting. It also bridges the gap between overhead fixtures and task lighting, reducing harsh shadows that make a space feel cramped.
Unlike bulky fixtures or hanging lights, thin LED strips and low-profile puck lights mount flush against cabinet undersides, maintaining clean sightlines and preserving your kitchen’s design. Modern thin under cabinet lighting also runs cool, doesn’t waste energy, and lasts for years. Installation doesn’t require a licensed electrician for plug-in models, and hardwired options aren’t significantly more complex.
LED Strip Lights vs. Puck Lights: Which Is Right for You?
The two primary thin under cabinet lighting options are LED strip lights and puck lights. Each has strengths, and the right choice depends on your layout, cabinet depth, and aesthetic preference.
LED Strip Advantages and Installation Tips
LED strip lights deliver continuous, even illumination across the full length of your cabinetry. They’re exceptionally thin, often just 0.25 inches thick, making them nearly invisible once mounted. Installation is straightforward: measure your cabinet width, cut the strip to length (most are cuttable every inch or two), peel the adhesive backing, and press firmly along the cabinet underside.
One key advantage is cost-efficiency. A single 24-inch to 120-inch LED strip typically costs $15–$50, versus $20–$40 per puck light. For a full galley kitchen, strips win on budget and simplicity. They’re also ideal if you want seamless lighting without dark spots.
Peel-and-stick adhesive works on most surfaces, but clean the mounting surface first with a degreaser or rubbing alcohol to ensure proper adhesion. If you’re working with textured cabinet undersides or older cabinets, a small dab of construction adhesive reinforces the bond. Most LED strips run on 12-volt or 24-volt systems, requiring a power supply (usually included). Some offer wireless remote dimming, which adds convenience for $10–$30 extra. Always route power cords discreetly behind cabinets or baseboards, visible cords undermine the finished look.
Puck Light Benefits and Spacing Considerations
Puck lights are discrete, coin-shaped fixtures that mount individually. Each one produces a focused spotlight effect, perfect if you prefer targeted illumination rather than continuous coverage. They’re great for highlighting specific zones, above a sink, prep area, or island.
Puck lights typically measure 2.5 to 3.5 inches in diameter and protrude only 0.75 to 1 inch, keeping them slim and unobtrusive. Most use the same 12-volt or 24-volt LED systems as strips, or they run on AA batteries for complete wireless freedom.
Spacing matters. For even coverage without dark patches, plan for one puck light every 12 to 18 inches of cabinet length. A typical 36-inch run needs two to three pucks: larger islands may need four or more. This spacing prevents the “disco ball” effect where bright spots alternate with shadows. Most puck lights mount with small clips or flush screws, making removal and repositioning simple if your layout changes. Unlike strips, pucks handle cabinet edges and corners gracefully, so they’re ideal for L-shaped or U-shaped kitchen configurations.
Installation Basics for DIY Success
Before you install anything, measure twice and test fit your fixtures. Measure the underside of your cabinets, record both the length and the depth (front to back). This matters because deeper cabinets may hide strips better, while shallow cabinets might expose the light source more visibly. Account for cabinet doors and any obstructions like overhead exhaust vents or cabinet bracing.
For strip lights, the installation sequence is simple. First, clean the mounting surface thoroughly with a lint-free cloth and rubbing alcohol: wait a few minutes for it to dry completely. Remove the adhesive backing in small sections as you press the strip firmly along the cabinet edge, working from one end to the other. Avoid stretching or twisting the strip, as this stresses the connections. Once positioned, let the adhesive cure for 24 hours before running power or repositioning.
For puck lights, determine spacing (typically 12 to 18 inches apart), then mark mounting points lightly with pencil. Drill pilot holes if using screws, or simply press adhesive mounts into place. Ensure lights are level and equally spaced, a laser level or straight edge is your friend here.
Power delivery is the next step. Most DIY-friendly under cabinet systems use plug-in 12-volt DC power supplies that connect to standard outlets. Route the power cord behind cabinets, through raceway trim, or along the backsplash, anywhere it’s hidden from view. Avoid leaving cord visible across the front of cabinets. If running a hardwired system, hire a licensed electrician: code requirements and circuit capacity vary by jurisdiction, and improper installation creates fire risk.
Always wear safety glasses when working overhead, and ensure the area is clear before drilling or mounting anything. Test your lights before committing to final placement. Most LED systems offer dimming or color adjustment via remote or app: familiarize yourself with controls now, not after installation.
Lighting Color and Brightness: Finding Your Perfect Match
Color temperature and brightness directly affect how your kitchen feels. These two factors can make or break your under cabinet lighting investment.
Color temperature is measured in Kelvin (K). Warm white (2700K to 3000K) has a cozy, incandescent feel, ideal for kitchens where you want comfort and ambiance. Neutral white (4000K to 4100K) is bright and energizing, perfect for task-focused spaces. Cool white (5000K or higher) mimics daylight and suits modern, minimalist kitchens. Most homeowners choose warm white for general kitchen lighting and neutral white for task-intensive zones. If you want flexibility, some LED systems allow you to switch between color temperatures or use RGB (color-changing) bulbs.
Brightness is measured in lumens. A good rule of thumb for under cabinet task lighting is 300 to 500 lumens per linear foot of cabinet run. For a 36-inch section, aim for 900 to 1500 lumens total. Too dim, and you’ll work in shadows: too bright, and you’ll experience glare or eye fatigue. Most quality LED strip lights deliver 600 to 1200 lumens per 4 feet, which suits most kitchens. Puck lights vary more widely (typically 100 to 300 lumens each), so multiply the number of fixtures by their output to check total brightness.
Dimming capability is worth the extra cost. A simple remote-control dimmer ($15–$30) lets you adjust brightness for different tasks, bright for cooking, dim for evening ambiance. Many modern systems integrate with smart home technology, allowing voice control or scheduling via your phone. This adds convenience without significant complexity.
Test before finalizing. If possible, borrow or temporarily install sample lights to see how a given color temperature and brightness level feel in your actual kitchen. Natural light, cabinet color, and wall finish all influence perception. What looks perfect in a showroom might feel off in your home.
Budget-Friendly vs. Premium Options
Under cabinet lighting spans a wide price range. Understanding what you’re paying for helps you make a smart choice.
Budget Options ($30–$80 per section)
Basic adhesive-backed LED strips from big-box stores offer excellent value. A 24-inch to 48-inch warm white strip with a plug-in power supply costs $25–$50. These are reliable workhorses: they’re bright enough for task lighting, easy to install, and last 15,000 to 25,000 hours (roughly 10–15 years of normal use). The trade-off? Minimal dimming control, no color-changing options, and less polished power cords. These work fine if you’re okay with fixed brightness and don’t need wireless controls.
Battery-powered puck lights ($15–$30 each) are even cheaper and require zero wiring. They’re perfect for renters or if you want to test the waters before committing. The downside: regular battery replacement and less consistent brightness over time.
Mid-Range Options ($80–$200)
Mid-tier systems typically include wireless remote dimming, higher lumen output, and better build quality. LED strips here often come in longer runs (up to 120 inches) with unified power systems that simplify installation. You’re paying for reliability, control, and longer warranties (often 2–3 years). Puck light sets at this price point offer better spacing flexibility and often include motion sensors or scheduling features.
Many models integrate with smart home platforms like smart lighting systems, letting you automate brightness and color temperature changes.
Premium Options ($200–$500+)
High-end systems feature app-controlled RGB color-changing LEDs, advanced dimming, integration with voice assistants, and exceptional build quality. If you’re designing a luxury kitchen or want full lighting automation, these justify the cost. But, for basic task lighting, premium features rarely provide proportional value.
Smart Purchasing Tips
Read reviews on multiple platforms before committing. Check whether the power supply is included, some budget listings omit it, adding $20–$40 to true cost. Verify warranty coverage and return policies. Buy from retailers that accept returns if colors don’t match your space after installation. Compare lumens and color temperature specs across brands, not just price. A $40 strip with 800 lumens beats a $50 strip with 400 lumens, regardless of brand prestige.

