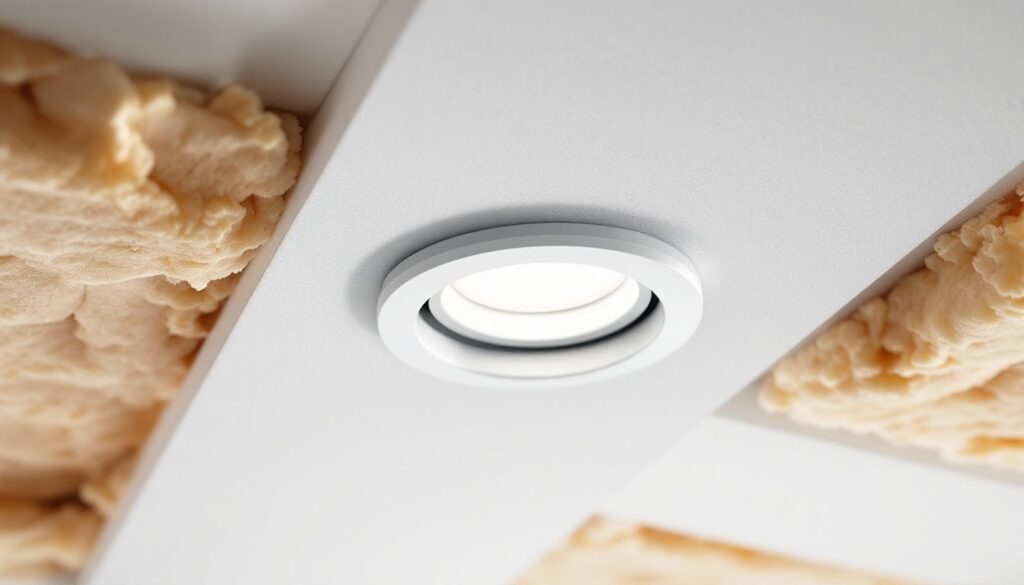
IC-rated recessed lighting isn’t just a technical specification, it’s the foundation of a safe, compliant lighting installation in your home. The “IC” stands for “Insulation Contact,” meaning these fixtures are engineered to sit flush against or within insulation without creating a fire hazard. A 3-inch recessed light is the workhorse of residential lighting: compact enough to fit standard joist spacing, powerful enough to light a room effectively, and energy-efficient when paired with LED bulbs. Whether you’re updating a kitchen, brightening a basement, or planning a whole-home lighting overhaul, understanding IC-rated fixtures, and why 3-inch models work so well, will save you money, prevent code violations, and get the job done right.
Table of Contents
ToggleKey Takeaways
- IC-rated 3-inch recessed lighting fixtures have built-in thermal protection that allows them to sit directly against insulation without creating fire hazards, making them code-compliant for modern well-insulated homes.
- A 3-inch recessed light’s 4-inch housing fits perfectly into standard joist cavities with strategic 4-5 foot spacing, eliminating the need for major structural modifications during installation.
- LED bulbs paired with IC-rated 3-inch fixtures consume only 8-12 watts per light compared to 50 watts for halogen alternatives, delivering significant energy savings and reduced HVAC strain year-round.
- Always verify local building codes and obtain necessary permits before installation, and stop the project if electrical wiring feels beyond your skill level to avoid safety hazards and inspection failures.
- Choose retrofit housings for finished rooms and new construction housings for open cavities, and select fixtures explicitly rated for wet locations if installing in bathrooms or damp areas.
What Are IC-Rated Recessed Lights?
IC-rated fixtures have internal thermal protection that allows them to operate safely when surrounded by insulation. Non-IC fixtures must be kept a minimum of 3 inches away from insulation, a rule that wastes energy and complicates installation in modern, well-insulated homes.
Every IC-rated fixture carries a thermal cutoff: a temperature-sensing switch that automatically shuts off power if the housing gets too hot. This prevents the fixture from igniting ceiling materials or nearby insulation. The National Electrical Code (NEC) requires IC-rated fixtures in any cavity where insulation touches the housing, and most jurisdictions enforce this strictly during inspections.
A 3-inch recessed light refers to the trim diameter, the visible ring that sits flush with your ceiling. The actual housing (the part roughed in before drywall) is typically 4 inches in diameter, giving installers enough wiggle room in standard 16-inch joist cavities. This size is the sweet spot: larger than 2-inch “pinhole” lights but smaller than 5- or 6-inch “flood” models that can overwhelm a residential ceiling.
Why 3 Inch Recessed Lights Matter for Your Home
Size and Placement Advantages
3-inch recessed lights are forgiving to install and versatile in their placement. A single fixture spreads light more evenly than smaller options and doesn’t require the dense spacing that 2-inch units do. In a 10-by-12-foot bedroom, three strategically placed 3-inch IC-rated fixtures, spaced 4 to 5 feet apart in a triangle or line, create balanced, shadow-free light without overlapping hot spots.
They also fit into existing ceiling structures without major framing work. If you’re retrofitting an older home with standard 2×6 or 2×8 joists, a 3-inch housing nestles into the cavity cleanly. You’ll avoid the awkward cutouts or joist sistering that larger fixtures sometimes demand.
Energy Efficiency and Performance
Pair a 3-inch IC-rated fixture with an LED bulb, and you’re looking at roughly 8 to 12 watts per light, compared to 50 watts for an old-school halogen recessed can. Over a year, the energy savings from replacing ten 50-watt halogens with 10-watt LEDs adds up to real money, especially if you run your lights several hours a day.
IC-rated housings, by design, don’t trap heat. Proper insulation around the fixture keeps that thermal cutoff inactive and reduces the “thermal load” that old fixtures added to your HVAC system. In summer, your air conditioning won’t work as hard: in winter, you won’t lose conditioned air through a leaky, undersized housing. Modern Recessed Lighting: Enhance Your options with integrated LED trim kits make this efficiency easy to achieve without custom rewiring.
Installation Essentials for Homeowners
Before you cut a single hole, verify your local building code and check whether a permit is needed. Many jurisdictions require permits for electrical work: some allow homeowner permits, others don’t. Call your local building department, skipping this step can trigger a failed inspection or an insurance claim denial if something goes wrong.
Materials and Tools
- IC-rated 3-inch recessed housing (retrofit or new-construction type, depending on your situation)
- Drywall saw or oscillating multi-tool with drywall blade
- Stud finder (to locate joists and confirm spacing)
- Measuring tape and pencil
- Wire connectors (18/2 or 14/2 wire, depending on circuit)
- Trim ring (baffle, open, or gimbal, your aesthetic choice)
- LED bulb (dimmable or non-dimmable, per fixture specs)
- Circuit breaker (20-amp for lighting is typical: confirm panel capacity)
Step-by-Step Overview
-
Mark the locations. Measure and mark the center points of each fixture on the ceiling using a stud finder to avoid hitting joists. Aim for 4- to 5-foot spacing for even coverage. Snap chalk lines if you’re installing multiple lights in a line.
-
Cut the holes. Use a drywall saw to cut a 3.5-inch hole at each mark (slightly larger than the trim diameter to let the housing fit snugly). Don’t force it, if you hit a joist, move the fixture 6 inches to the side.
-
Run the wiring. If you’re connecting to an existing circuit, shut off the breaker and test with a non-contact voltage detector to confirm the circuit is dead. Run 14/2 or 12/2 wire (depending on breaker size and code) from the power source to each housing. If you’re not confident wiring electrical circuits, stop here and call a licensed electrician, this is not the place to learn on the job.
-
Insert the housing. Push the IC-rated housing into the cavity from below. It’ll rest on tabs or friction fit against the drywall. Confirm it’s level and secure.
-
Connect the wires and attach trim. Use wire connectors to join the housing’s incoming wire to your circuit wire. Screw or snap the trim ring into place, insert the LED bulb, and test.
Safety First
Wear safety glasses and a dust mask when cutting drywall, drywall dust is fibrous and irritating. If you’re working in an attic above the fixture, watch your step and avoid crushing the housing or wiring. Always confirm the circuit is off before touching wires, and never work on a live circuit, even if it’s “just a light.”
IC-rated fixtures allow insulation to rest directly on the housing, but don’t pile insulation excessively around the fixture or block its thermal vents. The fixture needs a little breathing room. Modern discussions on recessed lights and thick ceilings often highlight this balance, tight insulation is good, suffocation is not.
Choosing the Right IC-Rated Fixtures
Not all 3-inch IC-rated fixtures are created equal. Here’s what to evaluate:
New Construction vs. Retrofit
New construction housings are designed for open cavities (before drywall), while retrofit (or “old work”) housings clip to existing drywall and save you from tearing into the ceiling. If you’re adding lights to a finished room, retrofit is your only option without major surgery. If you’re roughing in a new room or kitchen remodel, new construction gives you cleaner wiring runs and better thermal control.
Trim Options
The trim ring, the visible part, comes in a few styles. A baffle trim has ridges that reduce glare and work well in kitchens or offices. An open trim is sleek and minimal for modern spaces. A gimbal trim tilts up to 30 degrees, perfect for accent lighting or angled ceilings. All these fit the same 3-inch housing: it’s just the decorative ring that changes.
LED vs. Halogen Bulbs
LED is the clear winner here. A 10-watt dimmable LED matches the brightness of a 50-watt halogen, costs a fraction to run, and lasts 20,000+ hours. Halogen is out: it’s outdated, inefficient, and runs hot. Look for bulbs rated for 2700K (warm white) or 3000K (neutral white) for residential spaces. Confirm the fixture accepts the bulb type, some older IC-rated housings are not dimmable, and forcing a non-compatible bulb can damage the thermal cutoff.
Wet Location and Vapor
If you’re installing recessed lights in a bathroom, sauna, or other damp space, choose fixtures explicitly rated for “wet” or “damp” locations. These have sealed housings that resist moisture. A standard IC-rated fixture in a steamy bathroom will fail prematurely. Home improvement resources like Bob Vila’s renovation guides often stress this overlooked detail, moisture and electricity are a bad pair.
Recessed Lighting Housing Specifics
If you need more detail on how housings connect to your overall lighting layout, Recessed Lighting Housing: A Comprehensive Guide covers the broader ecosystem of housing types, trim coordination, and multi-room planning.
Conclusion
A 3-inch IC-rated recessed light is a reliable, code-compliant choice for most residential spaces. It’s energy-efficient, forgiving to install, and pairs seamlessly with modern LED bulbs. The key is understanding what IC-rating means (insulation contact protection), respecting your local electrical code, and not cutting corners on wiring or thermal safety. If the electrical work feels beyond your comfort level, hire a licensed electrician, a $300 or $400 professional install beats a fire hazard every time. Done right, your recessed lighting will disappear into your ceiling and simply do its job: light your home safely and efficiently for years to come.

