Running recessed lights through your home transforms the look and feel of any room, but only if they’re wired correctly. Unlike surface-mounted fixtures, recessed lighting requires careful planning and attention to your home’s electrical system. Whether you’re installing lights in a kitchen, living room, or hallway, understanding how to wire multiple recessed lights in series or parallel configurations is crucial. This guide walks you through the essentials: what you need, how to run the wires safely, where code requirements matter, and how to troubleshoot when things don’t work as planned. You don’t need to be an electrician, but you do need patience and respect for electrical safety.
Table of Contents
ToggleKey Takeaways
- Parallel wiring is the safer, standard approach for residential recessed lighting installation because each fixture operates independently, preventing total circuit failure if one light fails.
- A recessed light wiring diagram should use 14/2 Romex cable for 15-amp circuits or 12/2 for 20-amp circuits, with most residential installations safely handling 6-10 LED fixtures per circuit at 40-60 watts each.
- IC-rated (insulation contact) recessed lights are mandatory if fixtures will touch insulation or sit in an insulated ceiling, as non-IC units create serious fire hazards.
- Before wiring multiple recessed lights, always confirm your breaker panel has available slots and that your home’s electrical service can handle the additional load to avoid mid-project complications.
- Test all wires with a voltage tester after shutting off the breaker, wear safety gear, and never hide junction box connections inside walls—all must remain accessible per National Electrical Code (NEC) requirements.
- Voltage drop over long cable runs (over 50 feet) causes flickering or dimmed lights, so upgrade from 14/2 to 12/2 cable or split the load onto two circuits to maintain consistent brightness.
Understanding Recessed Lighting Basics
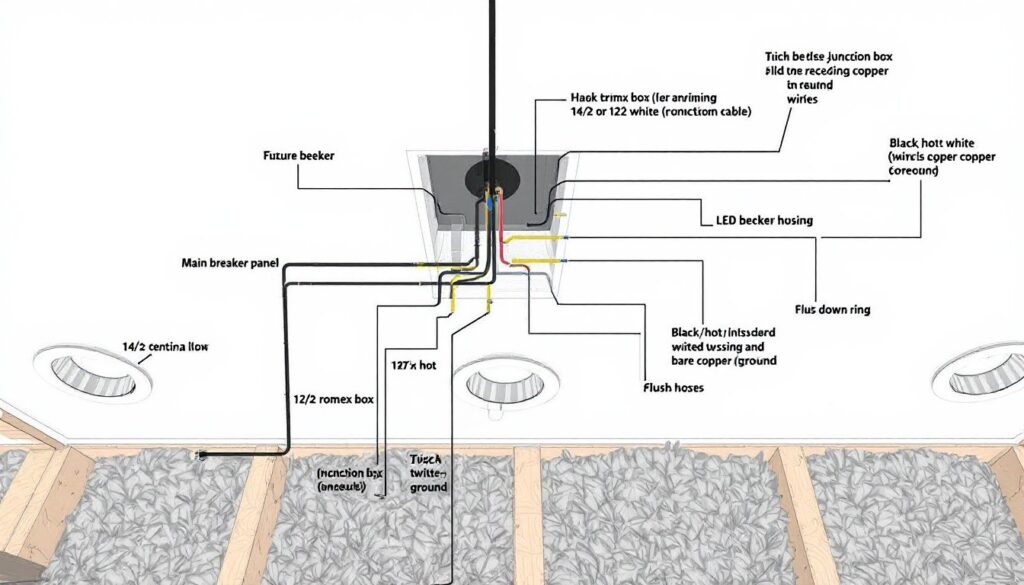
Recessed lights, also called can lights or downlights, sit flush with the ceiling, creating a clean look without visible fixtures. Each unit consists of a housing (the metal box that sits between joists), a trim ring, a light source (LED, halogen, or incandescent), and recessed lighting housing that handles heat and electrical connections.
When wiring multiple fixtures, you’ll use one of two approaches. Series wiring connects lights one after another along a single loop of wire, if one fails, all lights after it go dark. Parallel wiring ties each light independently to the power source, so each fixture operates on its own circuit branch. Most residential installations use parallel wiring because it’s safer and more reliable.
Before you start, confirm your recessed lights are IC-rated (insulation contact) if they’ll touch insulation or sit between studs in an insulated ceiling. Non-IC fixtures require clearance from insulation and can create fire hazards. Check the housing label or the packaging. Also, verify the voltage requirement, standard residential is 120 volts, but some specialty fixtures differ.
Tools And Materials You’ll Need
Tools:
- Voltage tester or multimeter
- Wire strippers
- Screwdrivers (Phillips and flathead)
- Wire connectors (twist-on or push-in)
- Flashlight or headlamp
- Fish tape (if running wire through finished ceiling)
- Drill or oscillating tool (for cutting drywall access holes)
Materials:
- 14/2 Romex cable (for 15-amp circuits) or 12/2 Romex cable (for 20-amp circuits). Most residential recessed lights use 14/2.
- Wire connectors sized for your cable gauge
- Electrical tape
- Junction boxes if combining circuits
- Outlets or junction boxes for connections inside the ceiling
Safety gear:
- Eye protection (wire clips and metal edges are sharp)
- Work gloves
- Dust mask (attic or crawl space work)
- Ground yourself with an anti-static wrist strap if handling sensitive components
Double-check that your breaker panel has available slots and that your home’s main service can handle the additional load. Many DIYers forget this step and discover mid-project that they need an electrician to expand the panel.
Wiring Multiple Recessed Lights In Series
Series wiring is simpler to run in tight attics but riskier for reliability. Each light depends on the previous one, so a loose connection or failed bulb can trip the whole circuit.
Basic steps:
- Turn off power at the breaker and confirm it’s off with a voltage tester.
- Run a single wire from the breaker to the first fixture’s junction box.
- Connect the hot wire (typically black) to the fixture’s hot terminal. Connect the neutral wire (white) to the neutral terminal. Bond the ground wire (bare copper or green) to the fixture’s ground screw.
- Run wire from the first fixture to the second fixture’s junction box, feeding it through the junction box of the first light.
- Repeat at each fixture, continuing the loop until the last light.
- Terminate the circuit at the final fixture, don’t leave wires dangling.
Use wire connectors rated for your cable gauge (typically yellow for 14 AWG, red for 12 AWG). Twist wires together clockwise, then screw the connector on until snug. Wrap the connection with electrical tape for extra security in damp spaces.
If you need to splice wires mid-run, use a junction box. Never hide connections inside walls or between studs. Building codes require junction boxes to remain accessible.
Parallel Wiring Configuration
Parallel wiring is the safer, standard approach for residential recessed lighting. Each light connects independently to the power source, so a single failure doesn’t darken the whole run.
Basic setup:
- Run a main supply wire from your breaker to a central junction box or splitter near your fixture cluster.
- Distribute wires from this box to each individual light. Think of it like a power strip feeding separate cords, each fixture gets its own pair of hot, neutral, and ground wires.
- Connect each light independently using the fixture’s built-in terminal blocks or wire connectors.
- Use proper gauge wire for the distance. For runs longer than 50 feet, consider stepping up from 14 AWG to 12 AWG to prevent voltage drop (dimmer lights at the end of a long run).
Many installers create a daisy-chain within the parallel layout: the main wire feeds the first fixture, then branches off into secondary runs to each additional light. This reduces the number of wires running back to the source but maintains the safety benefit of individual circuit paths.
Recessed lights typically draw 40–60 watts each (LED) or 60–100 watts (halogen). A 15-amp circuit on 14/2 cable can safely handle roughly 1,440 watts, so six to ten LED fixtures work comfortably on one circuit. Use a dedicated 20-amp circuit with 12/2 cable if you’re adding more than ten lights or mixing in higher-wattage bulbs.
Safety Considerations And Code Requirements
Electrical work is not forgiving, and mistakes can cause fires or electrocution. If you’re uncertain at any step, hire a licensed electrician.
Key safety rules:
- Always turn off and lock out the breaker before touching any wires. Use a breaker lockout device so others can’t accidentally flip it back on.
- Test wires with a voltage tester after shutting off the breaker to confirm they’re truly dead.
- Never work on wet hands or in damp conditions. Attics after a rain or bathrooms without proper ventilation are risky.
- Wear eye protection. Staples, wire clips, and sharp housing edges cut easily.
- Don’t overload circuits. If you’re adding recessed lights to an existing circuit already running other devices, recalculate the total load. A microwave and six lights on one breaker can trip constantly.
Code compliance:
- National Electrical Code (NEC) requires all junction boxes to remain accessible, never bury them in insulation or drywall.
- Your jurisdiction may require a permit for new electrical circuits. Check local requirements before starting: unpermitted work can void insurance claims or complicate home sales.
- Recessed lights in bathrooms and kitchens may need to be on a separate 20-amp circuit, depending on code and what else is on that circuit.
- IC-rated fixtures are mandatory if lights will be covered with insulation: non-IC units create fire hazards.
When in doubt, check with your local building inspector or hire a licensed electrician. The extra cost now beats a house fire later.
Troubleshooting Common Wiring Issues
Lights don’t turn on:
- Check the breaker, it may have tripped if you overloaded the circuit.
- Test each fixture’s on/off switch if the fixture has a dimmer or local switch.
- Use a voltage tester at the fixture junction box to confirm power is reaching it. No voltage? Trace back to the previous light or the breaker.
- Check for loose wire connectors. Vibration from HVAC or settling can loosen twist-on connectors: re-seat them and consider upgrading to push-in connectors.
Lights flicker or dim:
Voltage drop is the usual culprit. Long cable runs (over 50 feet) feeding many lights causes this. Solution: upgrade from 14/2 to 12/2 cable, or split the load onto two circuits.
One light is dark, others work:
If you’re in a series circuit, the bad light is blocking the rest. In a parallel setup, that fixture has a loose connection or failed bulb. Tighten connections at the fixture and swap in a new bulb. If still dark, the fixture’s junction or ballast may have failed.
Breaker trips immediately:
You likely have a short circuit, a hot wire touching neutral or ground. Turn off the breaker and visually inspect all connections for exposed copper or damaged insulation. Don’t power back up until you find and fix the short. This is where a voltage tester and continuity setting on a multimeter become invaluable.
If troubleshooting doesn’t reveal the issue, stop work and call a professional. Electrical problems hidden in your ceiling are not worth guessing on.
Conclusion
Wiring multiple recessed lights properly means respecting your home’s electrical system and following code. Series wiring saves time but sacrifices reliability: parallel wiring takes more wire but gives you a safer, more dependable result. Plan your layout, gather the right materials, and don’t rush connections, poor terminations cause most DIY electrical failures. When you flip the switch and see your recessed lights glow evenly across the ceiling, you’ll know the careful prep work paid off. If the scope exceeds your comfort level, hiring a licensed electrician is a smart investment in safety and peace of mind.

