Your <a href="https://stoddardcarpets.com/kitchen-sink-lighting-ideas/”>kitchen is the heart of your home, and the right LED lighting can transform it from a dim, awkward space into a functional, welcoming hub. LED kitchen lighting has revolutionized how homeowners approach illumination, offering energy savings of up to 80% compared to incandescent bulbs, superior brightness, and decades of reliable performance. Whether you’re installing a new kitchen or upgrading outdated fixtures, understanding your LED options and how to plan a layout that actually works will save you time, money, and frustration. This guide walks you through everything you need to know about LED lighting for kitchens, from fixture types to installation best practices.
Table of Contents
ToggleKey Takeaways
- LED kitchen lighting saves up to 75–80% on energy costs while lasting 15–25 times longer than incandescent bulbs, making it a cost-effective upgrade that pays for itself quickly.
- A three-layer lighting strategy combining ambient overhead lights, task lighting under cabinets, and accent fixtures eliminates shadows and ensures functional visibility in all work zones.
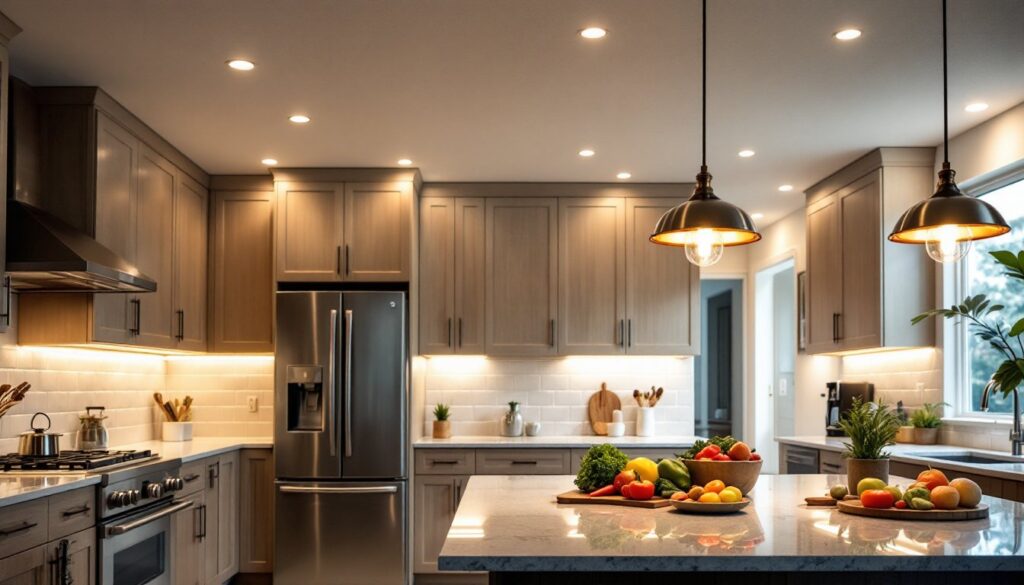
- Proper LED kitchen lighting layout requires recessed lights spaced 4–5 feet apart, under-cabinet strips along prep areas, and pendant fixtures 12–18 inches above islands for optimal coverage.
- Not all LED bulbs work with traditional dimmers—verify dimmable ratings and test compatibility before full installation to avoid flickering or performance issues.
- Safety and local electrical codes are critical: turn off power, use a voltage tester, and hire a licensed electrician for new circuits or work near water sources like sinks.
Why LED Lighting Is the Smart Choice for Modern Kitchens
LED bulbs consume roughly 75% less energy than incandescent or halogen alternatives and last 15–25 times longer, making them the obvious choice for task-heavy spaces like kitchens. You’ll spend less on replacement bulbs and see measurable savings on your electric bill. Beyond economics, LEDs deliver instant-on brightness, no warm-up time, and produce minimal heat, which keeps your kitchen cooler during cooking. Color temperature options range from warm white (2700K) for ambient feel to cool white (5000K) for precise task work. Unlike older fluorescent tubes that flicker or hum, modern LED fixtures run silently and without the annoying hum that drivers nuts in tight kitchen spaces. The durability matters too. A single LED bulb rated for 50,000 hours won’t need replacing for over five years of typical daily use, whereas you’d swap out incandescent bulbs constantly. When you add up the labor, cost, and inconvenience of frequent replacements, LEDs pay for themselves quickly in a kitchen environment where lighting often runs for extended hours.
Types of LED Kitchen Lighting Fixtures
Overhead and Recessed Lighting Options
Overhead fixtures anchor your kitchen’s main lighting layer. Recessed downlights (also called can lights or pot lights) are the modern standard, they sit flush in your ceiling and deliver focused illumination without visual clutter. A typical kitchen needs one 6-inch or 8-inch recessed light every 4–5 feet along the work areas: spacing them closer gives better coverage for food prep. They work beautifully in vaulted or cathedral ceilings where pendant lighting might look cramped. Install them above your main counter run and above the island, if you have one. For older homes or drop ceilings where recessed lights won’t fit, flush-mount or semi-flush LED ceiling fixtures do the job, just avoid placing them directly above prep zones where shadows from your own body will land on your work. Track lighting adds flexibility: rotate or angle individual heads to adjust light where you need it, which works especially well in open-plan kitchens where one overhead fixture can’t reach every zone.
Recessed Lighting: Enhance Your gives you in-depth options if you’re planning a whole-home overhaul.
Under-Cabinet and Task Lighting Solutions
This is where LEDs truly shine (literally). Under-cabinet lights eliminate the shadow cast by overhead fixtures when you’re cutting vegetables or reading a recipe card. LED strip lights run along the underside of upper cabinets and cast direct light onto your countertop. They’re thin, affordable, and available in hardwired or plug-in models. Choose warm white (3000K) if you prefer a cozy kitchen feel, or bright white (4000K) for maximum visibility during detailed prep work.
Installing Under Cabinet Lighting: walks you through mounting and wiring considerations. Pendant lights above an island or bar add both task lighting and visual interest, hang them 12–18 inches above the work surface and space them about 30–36 inches apart for even light distribution. Experts at Good Housekeeping tested six popular under-cabinet LED options and found that quality brands consistently outperform budget alternatives in color accuracy and brightness uniformity.
How to Plan Your LED Kitchen Lighting Layout
Start by assessing your kitchen’s layout and work zones. Map out your main prep areas, typically the counters, stovetop, sink, and island, then note where natural light comes in during the day. You’ll want at least three layers: ambient (general fill light), task (focused work light), and accent (decorative or highlight light). For a 10×12-foot kitchen, plan four recessed downlights in the ceiling at roughly 3 feet from walls and spaced 4–5 feet apart. Add under-cabinet LEDs along all upper cabinets above food prep. If you have an island, recessed lights or a pair of pendant fixtures above it will prevent you from working in your own shadow. Measure twice, and use a laser level to mark recessed light positions before cutting drywall, drywall repairs are far costlier than taking an hour to get layout right. Consider dimmer compatibility: not all LED bulbs work smoothly with traditional dimmers, so buy dimmable-rated LEDs and test a few before committing to a full installation. Check local electrical codes about placement near water sources (sinks and dishwashers require fixtures rated for damp or wet locations). Led kitchen lighting solutions, so sketch your plan and compare brightness outputs (measured in lumens, not watts) against your work requirements.
Installation Tips and Best Practices
Safety first: Turn off power at the breaker and verify circuits are dead with a non-contact voltage tester before touching any existing wiring. Wear safety glasses and gloves, drywall dust and metal edges can nick skin or eyes during recessed light installation.
For recessed lights, cut holes in drywall using a drywall saw guided by your laser markings, then insert the housing into the opening. Secure it to joists with the included brackets, feed wire through the junction box, and connect to existing circuit wiring or a new run if needed. This step often demands a licensed electrician if you’re tying into breaker panels or running new circuits: check your local codes first.
Under-cabinet LED strips come in adhesive or fastener-mounted varieties. Clean the cabinet underside thoroughly with rubbing alcohol and let it dry completely, adhesive won’t hold on dust or grease. Measure and mark centerlines, then stick or screw the strip in place. Hardwired strips route power through existing cabinetry or above-cabinet raceways: plug-in models are simpler but add a visible cord you’ll want to hide.
When connecting multiple strips or pendant fixtures, check voltage (12V low-voltage systems or standard line voltage) and don’t exceed the power supply’s rated wattage. A cheap power supply will overheat and fail: invest in a certified 90–277V input supply if you’re building a larger system.
For pendant lights, confirm your ceiling can support the weight, joists and blocking matter. Install a fan-rated or heavy-duty fixture mounting bracket if weight exceeds 50 pounds. Hang wiring first, then position fixtures and test before tightening every fastener.
Digital Trends reviewed top LED strip lights for 2024, and many recommendations suit kitchen installation perfectly. Finally, label all breaker switches and dimmer controls so you know which circuits control which fixtures, saves troubleshooting time later.
Conclusion
LED kitchen lighting is no longer a luxury upgrade, it’s the standard approach to smart, efficient kitchen design. By choosing the right mix of overhead, task, and accent fixtures, planning your layout carefully, and installing with care, you’ll create a kitchen that’s both functional and inviting. Whether you tackle installation yourself or hire an electrician, the energy savings, long lifespan, and superior light quality make LEDs the investment that keeps paying back. Start with your work zones, layer your lighting thoughtfully, and enjoy a brighter kitchen for years to come.

